During the planning stages for our assault of the western half of the Trans-America Trail, Glen and I knew that we would be crossing some desolate areas void of fuel stations.
This is similar to our Trans-Labrador Highway ride (report) in 2011, when we also needed to carry additional fuel.
On the Trans-Labrador Highway ride, we simply used two-gallon (7.57 liters) plastic fuel cans found at any hardware store.
On that trip we had larger bikes, however; Glen was on his Suzuki DL650 V-Strom and I rode my BMW R1150GS (review), so it was easy to secure the fuel cans on the back.
We only needed to fill them once for the last, long section (240 miles / 386.2km) of gravel from Happy Valley and Goose Bay towards Red Bay in Labrador.
On this new adventure, riding the second half of the Trans-America Trail (report), we would be on much smaller bikes. Glen was on a Kawasaki KLX 250 and I rode a Suzuki DR-Z400S.
We had pared our luggage down to what we thought was the minimum, including our camping gear.
Both of our bikes were fitted with oversize fuel tanks, but even those would not take us far enough on a couple of long stretches, especially in Nevada and California. Besides, it never hurts to have a little fuel in reserve on a trip like that…
Extra Fuel for the Trans-America Trail
No matter how I played with that two-gallon hardware store container, I just couldn’t come up with a good, secure way of carrying it on the Suzuki.
On some sections of the Trans-America Trail, we would be encountering a lot of rock, sand, steep climbs and mud (just to name a few), so it would be imperative that a fuel cell would be securely attached to the bike.
My plan was to keep the loaded bike as narrow as possible to keep it from catching on rocks, branches, trees and other trail obstacles.
This turned out to be a good plan, since there were several places where, for example, after crossing a severely washed out road we had to hack and force our way through thick brush on our detour to get back to the main “road”.
We were also forced to ride through the sagebrush alongside the trail, because the ruts were nearly three feet (1 meter) deep in places due to the severe erosion, making it impossible to ride on the trail bed itself.
The Rotopax Fuel Pack
I had seen some examples of auxiliary fuel cells attached to various bikes while doing some trip research.
The auxiliary fuel storage cells included individual metal one-liter bottles that can be carried in a tank pannier, while others used flat plastic fuel packs that locked onto specific mounting brackets.
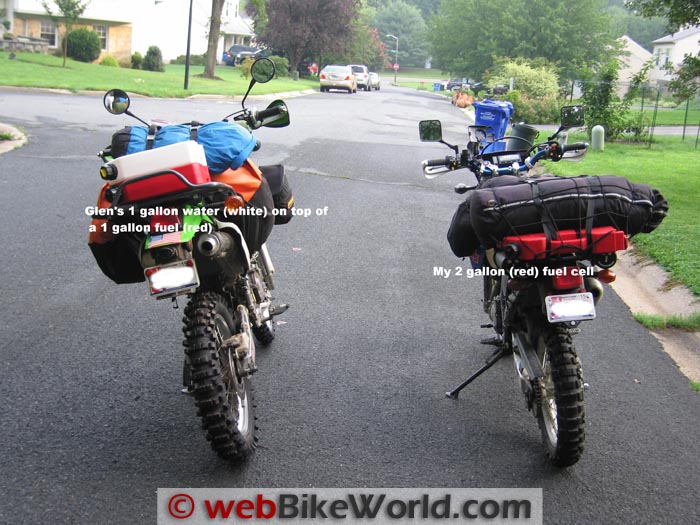
Although Glen brought four of the aluminum 1 liter bottles in addition to a one-gallon auxiliary cell, the bottles simply did not fit into my packing arrangement.
I also liked the looks of the flatter plastic fuel packs or “cells” and the fact that they can be mounted either vertically or horizontally.
They appeared adaptable to any bike and were a popular choice for those riders venturing off the beaten path. There are various brands, but one — RotopaX — kept rising to the top of everyone’s list…and ultimately ended on mine.
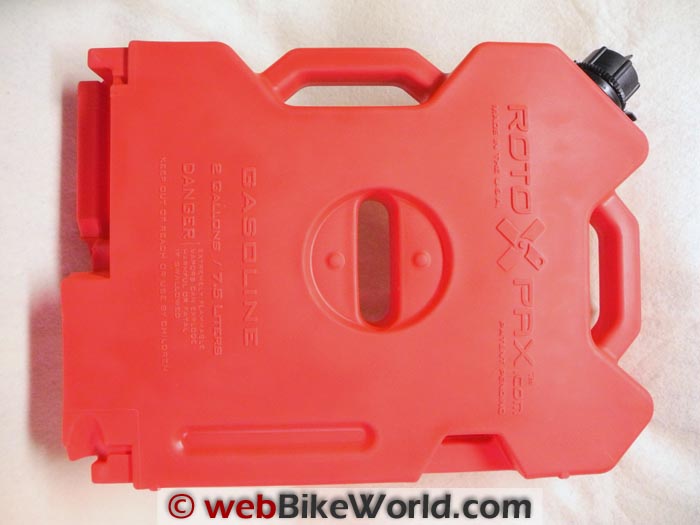
The Rotopax fuel packs are nothing like your usual hardware store fuel cans. The Rotopax fuel packs are made to stand up to rugged use and you can tell that just from the look and feel of the container.
Unlike less expensive “Harry Homeowner” cans, which are blow-molded, Rotopax uses a more expensive process called “Rotational Molding”.
In this method, the compound, polypropylene, is placed inside the mold, then the entire assembly, mold and all, is heated in an oven then slowly rotated.
This distributes the polypropylene around the entire inside of the mold.
Once completed, the entire assembly is slowly cooled, to prevent warping. This manufacturing method is apparently a more complicated process but reportedly yields a stronger product.
Rotopax also claims that their fuel packs “are the only EPA- and CARB-compliant fuel containers available for sale in the United States”.
Their molding process “along with specially formulated plastic barrier material” allows the Rotopax fuel packs to meet the permeability requirements for fuel containers sold in the U.S.A.
Rotopax Fuel Pack Types
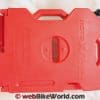
Rotopax fuel packs are available in capacities from one gallon (3.78 liters) to four gallons (15.1 liters) in one gallon increments, plus a 1.75 gallon (6.6 liters) pack.
The containers have a strange shape and the two gallon containers are made to interlock with each other to create a 4 gallon pack. It’s also possible to stack the Rotopax fuel packs on top of each other.
Each container has a molded handle on the top (the nozzle end) and one on the side for easy carrying and dispensing.
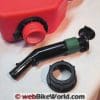
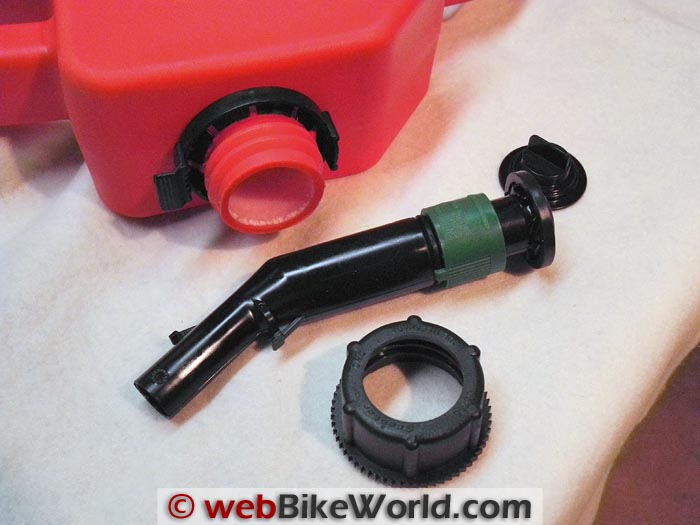
Included with all of the Rotopax fuel packs is a fill nozzle, which is one of those “safety types” that has a locking collar which needs to be rotated then the nozzle pressed against the edge of a fuel tank before the fuel will dispense.
I have to admit when the Rotopax container first arrived, I could not figure out how to get the nozzle to open. I was about to give up when it finally dawned on me that the nozzle had to be retracted or pressed back first.
Too bad I didn’t watch the instructional video that’s linked from their website first!
Other Rotopax Types
In addition to carrying gasoline (the red containers), Rotopax containers are available for water (white), kerosene (blue) and diesel (yellow).
The company is quick to point out that each container is not to be used to carry any other liquid other than what it is made for.
But wait, there’s more! Using the same molds, Rotopax has modified what appears to be the two-gallon container so that it opens on one side, to hold all sorts of stuff such as food, spare gear, small parts, first aid or survival items.
They’ve also done the work for you, if you prefer, and put together a couple of neat kits, using the red molded cells, such as a “First Aid+Preparedness”, a “Road+Trail Emergency” and their “72 Hour Preparedness” kit, which includes a (white) two-gallon water container.
All of these have been packed with a selection of supplies pertinent to that task.
After jotting down the dimensions of the 1.0, 1.75 and 2 gallon containers, I headed out to the garage to see what would best fit the DR-Z400S when laid flat on the IMMIX Racing rear luggage rack (review) I had installed.
In the end, I chose to go with the two-gallon Rotopax fuel pack because of its thinner (although wider) profile. The 1.0 and 1.75 gallon units were far thicker and would have made for an even taller pile of gear on the back of the Suzuki.
Glen opted to use a one gallon Rotopax pack for fuel (red) to supplement his four one-liter fuel bottles and he also bought a one gallon Rotopax container for water (white). These were mounted mounted one on top of the other on his Kawasaki.
Mounting the Rotopax Fuel Pack
Mounting the Rotopax fuel pack requires specific style mounting hardware to make it truly secure.
I get the impression these fuel cells are also popular with the ATV and Snowmobile crowd, so in addition to the basic mounting kits they have a selection of mounting plates available that are brand-specific.
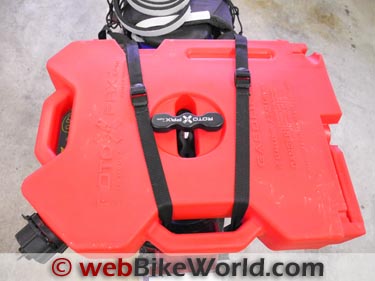
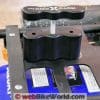
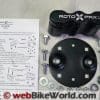
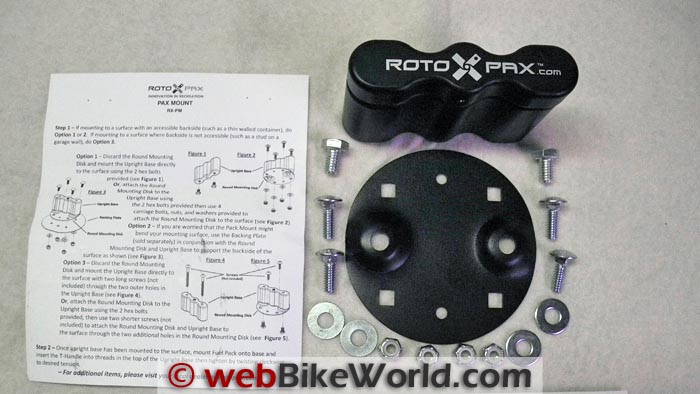
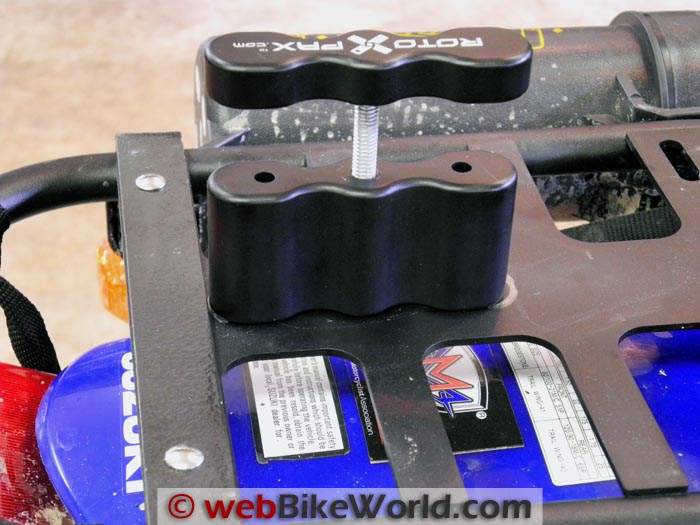
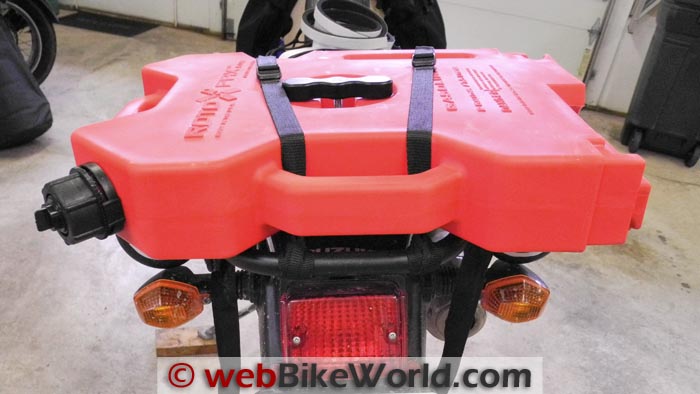
All I needed for the Suzuki was the basic “Pack mount”, which consists of a base plate, a center spacer piece that extends through the center of the fuel pack (to hold it from shifting in any direction) and the retainer handle assembly.
The retainer handle assembly consists of a handle with a threaded bolt in the center. As it is threaded into the center piece, eventually the handle comes in contact with the fuel cell housing and can be tightened as needed.
There are two raised “nubs” on the container and two “dimples” in the handle, so the handle sort of locks into place to keep it from un-threading itself.
Also included in the mount kit is the necessary hardware for installation. I chose to bolt the center spacer directly to the IMMIX Racing luggage rack, since the included plate really didn’t match up with how the rack was constructed.
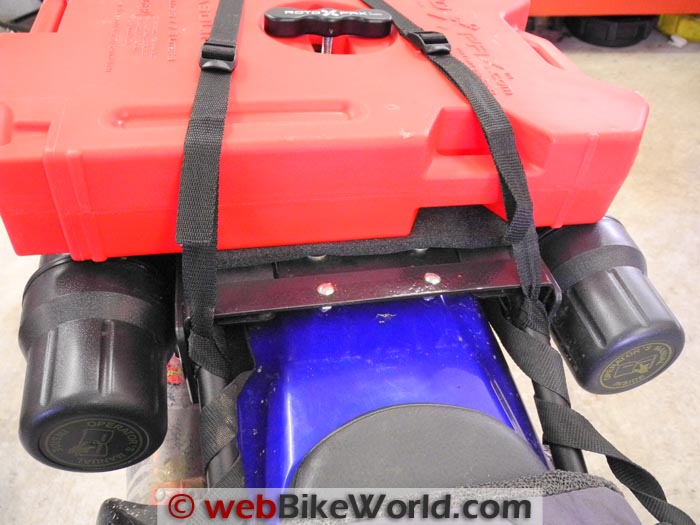
After playing around with where I wanted to locate it on the rack, two holes were drilled and the center spacer was fastened with the included bolts. I chose to have the opening pointed to the left rear of the bike.
This I thought would keep any leakage, if there was any, away from my luggage and on the side opposite the exhaust.
One potential problem I saw was the potential for the body of the Rotopax fuel pack to touch the heads of the bolts I used to secure the homemade brackets for the Motorcycle Tool Tubes (review) I had installed.
I had visions of the fuel cell chafing at these points, which might result in a leak, so I laid a few strips of closed-cell insulation I had on hand over the button head bolts, which provided enough protection.
Also, I’m sure the Rotopax mounting system would have been fine, but I just couldn’t resist adding two straps to keep the fuel pack from shifting.
The Test Ride
With the fuel pack filled and securely fastened down, it was time to take the bike for a quick ride to see what effect it might have on the handling.
I didn’t feel much of a change in the bike with just the additional fuel in the pack, so next up was a trial run with the bike fully packed and loaded.
Yes, I could feel the additional weight — and the fact that the weight was located up high — but altogether, no red flags were raised, so I was pleased with the arrangement.
Our bikes were shipped from Maryland to Denver fully loaded (no fuel in the Rotopax though) and a concern I had was that someone could simply loosen the retainer handle and walk off with the fuel cell.
Although I didn’t buy one, they do have available locking retainer handles to prevent just that from happening. Luckily, I have never had any of my bikes messed with anywhere.
The Rotopax Fuel Pack on the Trans-America Trail
At the beginning, since fuel stops weren’t that far apart, we left the fuel packs empty. But once we were in the desert, we filled all of the containers, and they did come in handy.
There’s a certain feeling you get in the pit of your stomach when your bike starts to sputter, with the engine starving for fuel and there’s nothing and no one — let alone a fuel station — to be seen as far as the eye can see.
Having that additional two gallons saved us a lot of walking through some tough terrain!
Despite banging over a lot of rocks, some steep rocky climbs, getting tossed about in the sand and slogging through mud, neither of our Rotopax containers ever came loose or leaked.
When we did have to stop and refuel, it turned into a race…which I always won, since I didn’t have to fiddle around with the lids on four metal fuel bottles like Glen did.
The nozzles on the Rotopax fuel packs worked every time and never leaked on us either.
All in all I’d say going with the Rotopax container was money well spent. I know the cheap two-gallon container I left at home would have come off on the trail for sure — like the quart of AMSOIL that mysteriously disappeared off the back of my bike somewhere in Utah (I think).
The only negative I have is that I wish there was a more translucent side or edge on the Rotopax container to better guage the fuel level. On almost every occasion, when filling, the container would suddenly filled to the brim, making it hard to leave an air pocket for expansion.
This resulted in a bulge in the fuel pack once the fuel heated up, so I had to either vent the pressure or pour some fuel into the bike’s fule tank.
But, at least I didn’t have to contend with the troubles Glen had every time he filled his metal one-liter bottles!
Because of the pump pressure at the filling station, he usually spilled the $4.00 per gallon fuel everywhere each time a bottle was filled. And that was after fighting to remove the screw-on lids…


Conclusion
When venturing well off the beaten path, it’s good pre-planning to figure out a way to carry additional fuel.
The fuel container must be securely fastened to the bike (or vehicle) and rugged enough to stand up to the pounding you’ll encounter on an off-road riding adventure.
Also, a self-contained filler nozzle is one less item you have to pack in your luggage and keep track of. Whether for fuel, water or other liquids, I feel that the a Rotopax fuel packs are more than up to the task.
Despite some “offs” in a wide variety of terrain, neither of us had any troubles, leaks or failures from our Rotopax containers.
I should point out that we both had our cells mounted high and tight, so they never came in contact with the ground in any of these mishaps.
With a simple but effective mounting system, the Rotopax fuel packs are quick to install and remove.
Carrying and handling the containers when they’re full or when pouring the contents is made easy with the two handles molded into the perimeter.
Although I dislike the newer EPA-style self-locking dispenser nozzle, once I learned how to use it, the system proved to be the best I’ve used thus far.
More wBW: Suzuki DR-Z400S Blog | Suzuki DR650 Blog
Owner Comments and Feedback
See details on submitting comments.
From “C.L.” (January 2014): “I have just read your review of the Rotopax fuel tanks and thought I would share with you one problem I had with them.
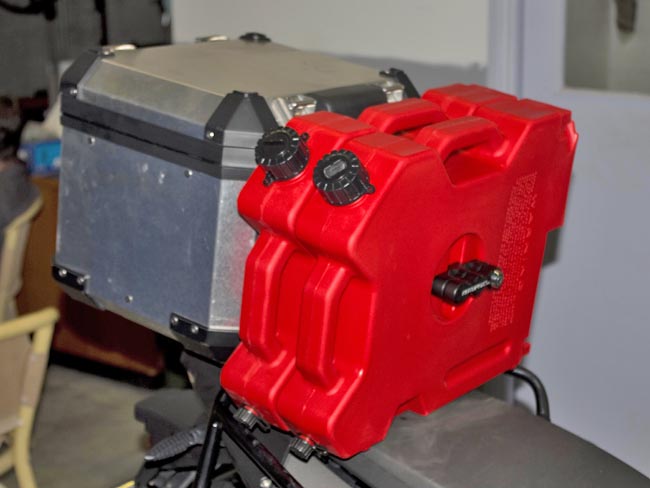
I have fitted their L bracket so I can have one or two of the 2 gallon packs mounted vertically on my F800GS, in front of my top box, resting on the pillion seat (photo below).
On a long extended outback road trip through South Australia while carrying both packs full, I had the threaded rod of the mounting system break off where it enters the mounting block through extended vibration, causing both packs to come loose. I had to tie the packs back to the rack until I could get somewhere to fix it.
On inspection the threaded rods (bolts) are only mild steel which I thought was a little disappointing considering they are not a cheap item.
We drilled the locking pins out and replaced all the bolts with high tensile stainless steel items and now make sure they are tied back to the top box when travelling with them full to help reduce vibration and support the weight.
This probably wouldn’t happen with only the one tank fitted or mounted horizontally but is a severe problem to consider if intending to mount them vertically.”
