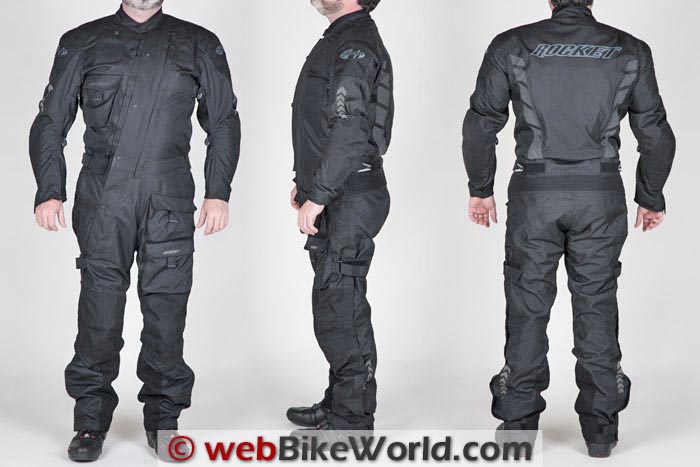
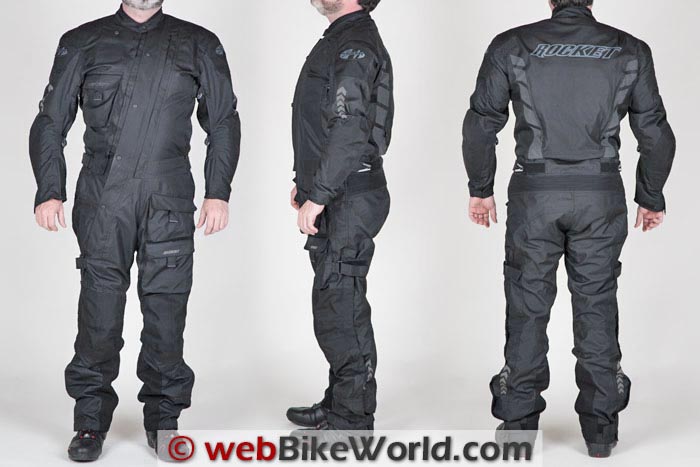
The Joe Rocket Survivor Suit is an inexpensive way to get into a one-piece textile suit that is versatile enough for year-round use (depending on your local weather extremes).
It also has a more “sporty” look than most other textile suits.
I have wanted a one-piece textile suit for several years.
There are plenty of reasons for this — some of which are practical — but I’ll admit I also just think one-piece suits are cool.
I have long thought about how convenient it would be to just zip a suit up over my clothes and ride to work.
I also like the potentially better protection a one-piece suit offers than the typical jacket and pants combo, because it cannot separate during a slide.
The barrier to getting a textile suit over the years for me has been the cost.
No doubt other riders who have lusted after a textile “onesie” have been stymied by this reason as well.
The Aerostitch Roadcrafter Classic, considered by many as the gold standard in textile riding suits, currently prices out at $967.00 at the time of this writing.
To me, that’s a lot of money.
I’m not saying it’s not worth the asking price, but the cheapskate budget-minded consumer in me just can’t bring himself to drop a grand on a riding suit, yet.
For the longest time there was not much competition in the textile suit arena, but these days there are some viable contenders with less expensive, off-the-rack examples.
This includes current offerings from Joe Rocket, Tourmaster, Scorpion, and Olympia that fall into the $350.00 to $450.00 range.
The Joe Rocket Survivor Suit
After studying the various specs and available sizes I decided to give the Joe Rocket Survivor suit a try.
It also happened to be the least expensive of the options I was looking at, but I’m sure that had nothing to do with my choice (no, really, I promise).
The Survivor Suit from Joe Rocket stood out for me from other suits in this price range in a few ways.
First, the suit styling is more “sporty” than most other suits I have seen; it looks like a convergence of some kind of flight suit and sci-fi space suit (since it’s made by “Joe Rocket”, this seems appropriate).
Another aspect I liked was the fact the suit uses a waterproof outer shell versus a waterproof liner (mid or inner).
While liners can certainly be effective at keeping water away from your skin, the outer shell can get soaked and make the suit heavy. Drying time after getting soaked through like that could be significant.
Finally, the Survivor suit has what Joe Rocket calls their “Big Air” ventilation system.
This involves a mesh strip that zips together behind the main zipper and it’s one I’m familiar with, having owned a similar setup in my Nova 2.0 jacket (also from Joe Rocket).
So there’s the reasoning behind the purchase decision compared to the other suits in the price range.
On paper it all looked good to me. Did the actual suit meet the expectations in the real world? Let’s have a look.
Styling Details
The Survivor Suit is a sharp-looking piece of motorcycle gear. Some textile suits tend to look bulky and heavy but the Survivor Suit just looks sleeker than others.
This is probably helped by the all-black suit in this particular example. Black is “slimming”, right?
Well slimming or not, the color choices for the Survivor Suit are either Black or Black and “Hi-Viz” Neon. The Hi-Viz color in is of the fluorescent yellow variety, which is located on the forearms, shoulders, front and back of the lower legs and on the sides of the torso.
In my case, I felt the pattern hit the nice sweet spot of not being too obnoxious but at the same time still improving visibility considerably.
Unfortunately I had to settle for an all black version due to my sizing.
My 30″ inseam fits better into the “short” version of this suit (more on sizing later) and the short sizes are only available in black.
Wouldn’t you think that shorter people need more visibility than taller ones? But I digress…
Survivor Suit Construction Notes
The Survivor Suit is constructed of Joe Rocket’s proprietary RockTex 600 material for the outer shell which, according to the label, is a blend of polyester and nylon (80/20).
This material feels like something between Cordura and ballistic nylon. It is a bit coarser than nylon, yet smoother and finer than Cordura.
The material feels strong and the stitching looks very even and straight. Double stitching is used in the majority of areas throughout the suit for extra strength.
Zippers
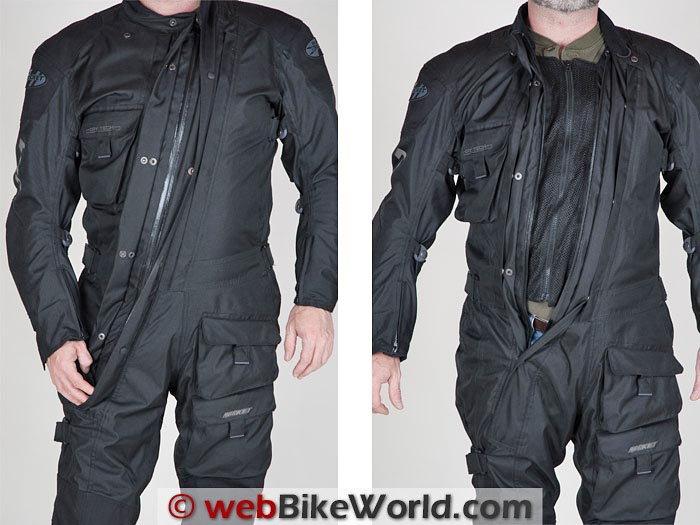
Zippers are plentiful on the Survivor suit. Starting at the neck is a waterproof zipper that runs all the way down to the knee of the right leg.
This zipper is a straight shot so instead of a perfectly vertical zipper running up the front of the suit, it runs at an angle from right knee to the neck.
This might seem a little odd but it does work and gives the suit a bit of a jaunty look.
Behind the main zipper is another zipper for the mesh panels of the Big Air ventilation system (more on that later). All of the zippers used on the Survivor suit are from YKK and most of them are of the waterproof sealing variety unless otherwise noted.
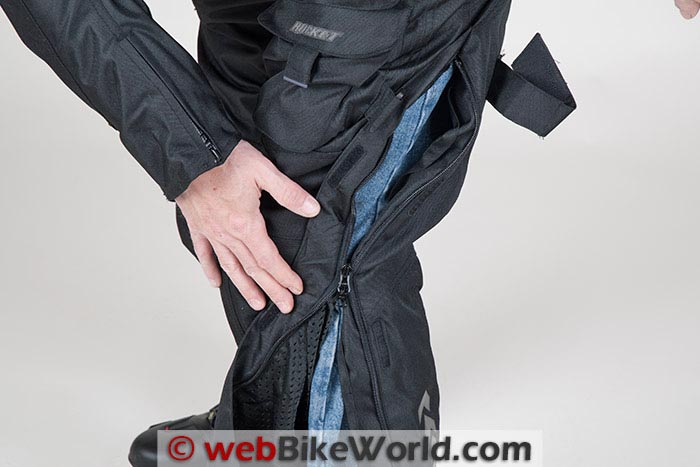
On the outside of each of the legs is a zipper (dual type) which allows for easy donning and removal of the suit while wearing boots or shoes.
The dual zipper function also adds a couple of extra features for temperature control which we’ll get into shortly.
These zips are unfortunately not of the waterproof sealing type of zips and instead they are covered with a flap on both the outside and inside of the pant leg. How well this works to keep out water I’ll also describe shortly.
Pockets
There are four pockets on the suit with three of them on the outside and one “Napoleon” style pocket on the inside.
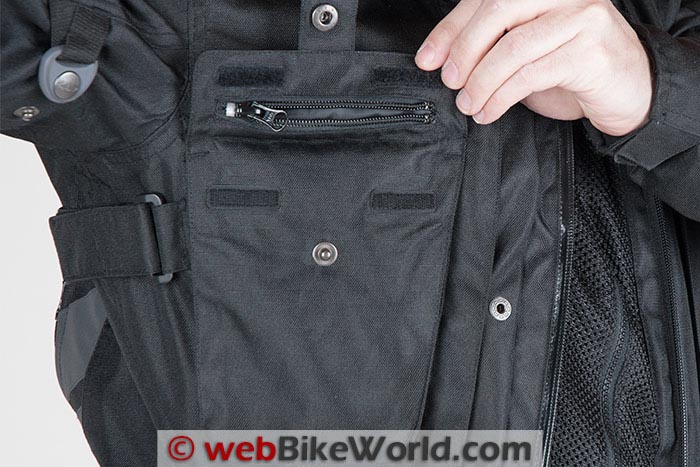
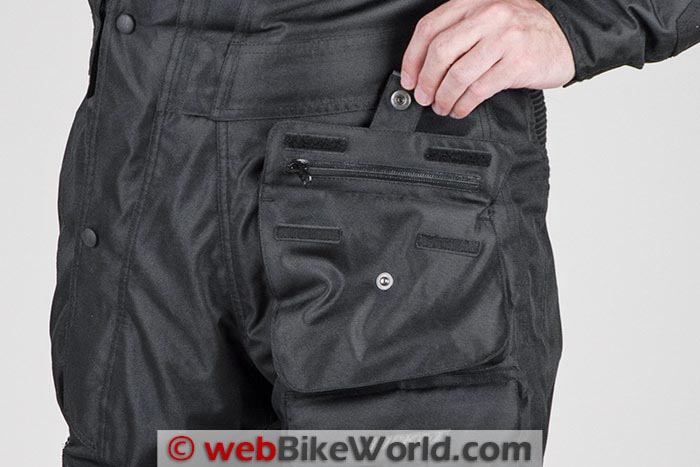
There are two pockets stacked vertically over the left thigh and one more on the right chest. All of these pockets have a “triple closure system”, which essentially means there is a zipper, a snap, and hook and loop fastener closures.
Specifically, the outside pockets are sealed with a zipper, which is integrated into a flap that is retained with a single snap and two small strips of hook-and-loop. I feel that this is a bit of overkill for the flap closure.
A snap or the hook-and-loop would suffice and, in my opinion, it makes getting into the pockets a little more time consuming than necessary.
For some reason, Joe Rocket chose to only use sealing waterproof zips on the thigh pockets. The chest pocket uses just a regular zipper for its closure (in addition to the aforementioned snap and hook-and-loop).
The only reason I can think for this is perhaps there is less chance of water moving up under the flap on the chest versus the thigh where the pockets are more horizontal.
Still, it seems odd to have left that out — especially as the chest pocket has an embroidered “Dry Tech” logo on top of the flap.
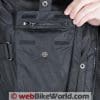
The internal pocket is located behind the Big Air mesh panel on the left side of the main opening.
This pocket should accommodate a wallet or cell phone sized item but would be a bit too small for say a fold up map.
In fact, none of the pockets would really fit most maps that I’ve seen, so if you’re fond of using these and carrying them on your person, this could be an issue.
Lining
The inside of the Survivor Suit is lined with a polyester mesh which is similar to that used in other Joe Rocket products I’ve owned in the past. It is very smooth and light feeling and has a bit of stretch in the horizontal directions.
The liner not only adds comfort but also contains pockets for the included elbow, shoulder, back, and knee armor.
On the front, on either side of the main zipper, are a flaps that snap together and overlap to help improve wind a water resistance to the main zipper.
Additionally there are smaller flaps flanking them with more snaps that allow one to peel back the main flaps and expose the zipper and/or the mesh panels of the Big Air vent. All of these snaps can be a bit fiddly but they do the job.
The collar, which I feel is a little short, is lined on the inside with a soft microfiber or microsuede material for comfort. It would be nice to have the collar a bit taller for better rain-proofing. If you often ride in the rain, a neck wrap of some kind might be in order.
Below the collar on the right side is a snap to hold open the collar when using the Big Air vent.
Branding is present in various locations including the pocket flaps, the waist adjuster straps, and the shoulder patches.
The Rocket logo is also stenciled across the top of the back. These are not really “in your face” though, as they are gray in color (in the daylight) and are present against black material.
Protection and Safety Features
Included with the Survivor Suit are CE-rated protectors for the elbows, shoulders, and knees. These are of the flexible “rubber-like material” variety.
The flexibility aspect is nice in that it makes the protectors less obtrusive for better comfort; however, other types of protectors can be fitted if desired if they fit in the hook-and-loop fastened pockets in the liner.
On the key impact areas (knees, elbows and shoulders), there is an additional layer of RockTex material for extra abrasion resistance.
The included dual-density spine pad is typical of what Joe Rocket installs by default in many of their jackets. It is actually more substantial than the thin foam pads that often are included with motorcycle jackets but it has no protective rating that I could find.
Fortunately I happened to have a Knox back protector insert that fit well in the Survivor Suit’s back protector pocket.
Overall, the standard protection is not a bad setup, but I would have liked to have found hip protectors included with the suit. At the very least, it would have been nice to have pockets to add hip protectors anyway.
I think it is a shame that hip protection is often overlooked by manufacturers (and riders). It’s rather easy to bruise a hip in a fall from a bike and a small section of padding in the right place can make a big difference.
Another issue I had is with the knee protectors.
While its placement is adjustable, the range is limited to just two positions. In my case, the knee protectors are too high and I end up with my kneecap under the middle of the protectors rather than under the knee cup section.
While it could be worse, an additional inch or two of adjustment would be appreciated.
The knee protectors also suffer from an issue that is all too common in textile pants and suits in that it isn’t able to be snugged against the leg and can easily move out of place in a crash situation. A pair of strap-on knee/shin protectors like I’ve reviewed previously would be a better choice for those wanting the better protection.
I think I’ve mentioned before, but the manufacturers should put straps around the legs above and below knee armor. This is already present in a lot of jackets above and below the elbow and definitely makes a difference there.
I’m just curious if there is a way to apply this same idea to pants legs. Perhaps using straps that stretch since leg muscles can vary in circumference greatly when flexed.
At the inside bottom of each of the pant legs is a large swath of what Joe Rocket refers to as a “melt-resistant material”. They don’t specify exactly what it is, but in the hand it feels like a soft canvas.
These are in place to help prevent damage to the outer shell in case in comes in contact with hot exhaust pipes. Nice touch.
Reflective patches in the shape of a series of chevrons are screened onto various locations including the upper arms and behind the calves. The back has two large strips of dashes running from the waist to the shoulder blades.
The Joe Rocket shoulder patches it turns out are reflective as well.
One thing that may not be readily apparent as a safety feature is the nature of a one-piece suit in general. Since there is no separation between pants and jacket, your midsection is less likely to end up exposed during a slide on the asphalt.
I have to say, I do like this aspect of a one-piece suit. I often try to mitigate this potential hazard by getting pants and jackets that can zip together but even that doesn’t feel quite as reassuring as riding in a suit like this.
Survivor Suit Fit
Sizing and fit is going to be much more specific in the case of a one-piece suit than it is with a separate jacket and pants combo.
Since there were no local shops nearby with a Survivor Suit in stock, I called MotorcycleGear.com, the webBikeWorld Affiliate, to chat with one of their sales people.
They are typically very good about knowing (or finding out) about how the products they sell fit.
This occasion was no exception. After I spent a few minutes discussing my “particulars” we decided the XL/ Short would probably be the correct size for me.
Two days later, when the box arrived, I was very pleased with how the suit fit. The length was just right for my legs and boots and the sleeve length was correct.
The most important factor for one piece suits is the distance from the neck to the crotch. Too long and the suit gets baggy quickly; too short and, well, there’s just no way it would be comfortable for long if at all.
That’s why sizing one-piece suits is so tricky and why customizable suits are so popular. If you’re lucky, like I was in this case, you’ll happen to fit into one of the standard sizes well enough to not need a custom suit.
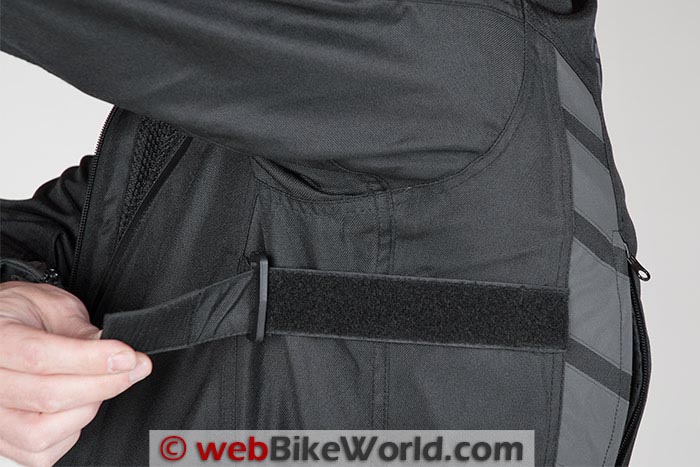
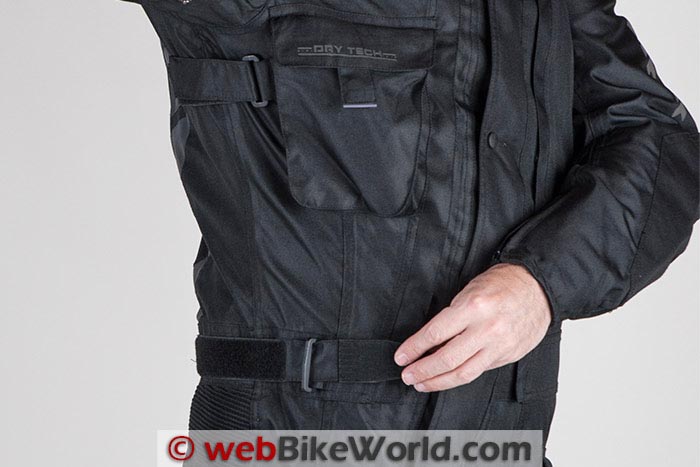
The Survivor Suit does include several adjustment points to help customize the fit to a degree and these do come in handy. At the waist and chest level there are adjustment straps to cinch these areas of the suit close(r) to your torso.
There are also straps around the thighs to adjust the fit around the legs. These adjustments work well to help the wearer accommodate various clothing that is worn under the suit.
At the back of the waist is a section of accordion stretch material to allow the suit to fit a wide range of seating positions.
For instance, I was able to wear my normal business casual clothes under it without much trouble slipping the suit on over them.
At the same time this also works well if one just wants to “go light” as I recently did on a warm day to test the ventilation. In this case I wore cycling shorts and thin athletic long sleeve T shirt.
I was able to cinch down the straps to keep the suit feeling snug despite the thin clothing.
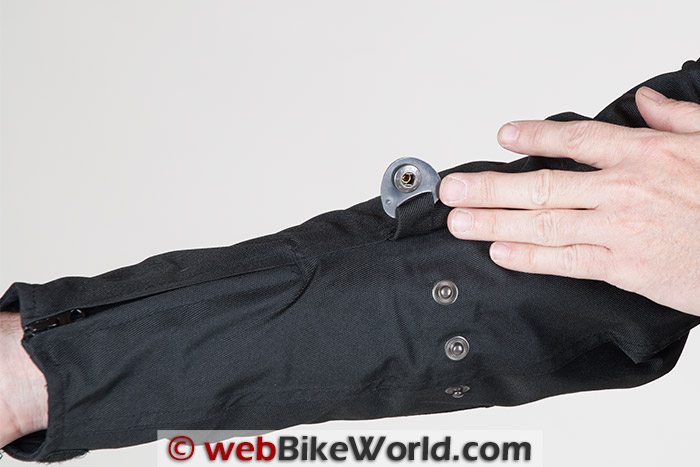
The sleeves of the suit offer two sets of snap adjusters for keeping the sleeves snug and the elbow armor in place. They work well enough but I will look down once in a while and find one of the sleeve snaps has come loose.
It’s not an everyday occurrence but the snaps could be a bit stiffer so this wouldn’t happen.
The sleeve cuffs have a gusset that is closed with a zipper and a separate hook and loop adjuster for cinching the cuff closed.
The opening of the cuff is a bit on the small side so those who like to wear their gloves tucked into their sleeves might find this difficult.
The openings of the pants legs also have a section of hook and loop to help tighten the material around boots. This area suffers from the opposite issue as the sleeves as the opening is rather large and it can be difficult to cinch the material around a boot.
This type of snugness can help keep water from getting into boots when riding in the rain.
The collar is one place that unfortunately does not offer any adjustment. In my case it is about the right size but it would be nice to make it tighter to keep rain from running down my neck.
Getting in and out of a one piece suit can be a bit of a chore for the uninitiated. I haven’t had much experience with them myself until receiving this suit but I can say two things: One, it gets easier with practice.
The first few times I put on the suit I felt like I had pulled a muscle here or there in my back as I struggled to get it on. Now I can put it on more quickly than I probably could regular overpants and a jacket.
Two, despite the suit being made of textile it still does “break-in”.
When I initially got the Survivor Suit, the material was a bit stiff but now with regular use it has softened. I believe this in addition to practice has made the suit much easier to don than before.
Overall the fit is good for me. If I intended to wear bulkier clothing underneath such as layering up for the winter, I would probably have needed to go a size larger in which case it would be very loose during warmer times.
During the winter I used an electric vest (see more info below) and it was a snug fit but worked very well once I figured out how to run the wiring.
Survivor Suit Insulation
My hopes for the Survivor Suit were that I would be able to wear it nearly all year ’round, except for the hottest days of summer. That’s a rather tall order for any piece of motorcycle gear, but one can dream, right?
It turns out it might not be that far-fetched of a dream after all.
The Survivor suit comes with a full length quilted zip in liner and it is of a light- to medium-weight, which is typical of most of these types of liners that come with a jacket or pants.
It works well enough to allow riding in weather colder by an additional 10 to 15 degrees (F) or so. This is hard to quantify precisely as time spent in the wind will have a bearing on how long the extra insulation will help and to what degree.
My typical 30 minute commute, which is a mixture of interstate and secondary roads, was long enough for the liner to start losing the battle of heat containment versus the wind trying to remove it on very cold days.
In my case, I chose to remove the quilted liner and instead use a heated vest for two reasons.
First, the quilted liner does take up some space in the suit and once installed and then the suit is zipped up over my normal clothing, things got a bit tight.
If I intended to use the liner more frequently, I would have ordered a larger size suit but I preferred to use a heated vest instead.
Second, I like being able to adjust the heat as needed…which is easy to do with heated clothing. The vest in this case was all I needed, as my bike puts out copious amounts of heat, directed to my legs.
If this wasn’t the case, then pants liners might be needed as well.
In either case, I prefer heated gear to adding a zip-in quilted layer (or layers), especially when the temperature may vary through a single day.
It’s as easy to remove a heated vest than the more laborious chore of removing a full-length liner, which in this case is held in with a zipper, snaps, and hook-and-loop fastener.
The electric clothing works great but I had to think for a few minutes about how to run the power wire through the suit. I’m used to letting a cable run out under my jacket, so I had to come up with a different way of doing this.
I finally realized that the dual zippers on the legs provided a perfect spot to run the cable. I could simply unzip the top zipper a little and run the wire through the opening and then zip it closed (or close to it anyway).
Survivor Suit Ventilation
Let’s take a look at the Joe Rocket “Big Air” ventilation system used in the Survivor Suit. Behind the main zipper are a pair of two-inch wide mesh panels that can be zipped together.
When they are attached this way, the main zipper can be opened and this lets fresh air in through the mesh, yet still maintains the integrity of the suit, since the panels are holding the suit closed.
The Survivor Suit has an extra row of flaps with snaps on them to either side of the main zipper opening.
These allow the main flaps to be folded out and snapped into a spread-out position so the mesh panels are unobstructed.
The collar also has a snap near the clavicle to help keep the opening nice and wide. Just undo the main zipper to start letting in fresh air and it can easily be adjusted to let in more or less air volume.
All of this air flowing into the front of the suit needs a way out. In the rear of the suit are two vertical vents for this purpose. Once they’re opened, you can really feel the air as it flows around the torso and out the back.
I was very impressed with how well this worked and how I could adjust it the airflow throughout the day as the temperatures climbed.
The leg zippers are also a huge benefit in the heat as well. Just before finishing up this review I was lucky enough to get some riding time in temperatures that were in the mid-80’s (F). Not terribly hot, but certainly warm enough to test a black one-piece suit in the sun on a bike that could heat a small home.
So for even more cooling I tried unzipping the top pants leg zippers down from their upper thigh position to the knee. This added a great deal of ventilation without making the opening too large.
Also, the opening won’t flap around, because there are repeated hook-and-loop fasteners along the length of the leg at the zippered opening.
With the Big Air vent open and the leg zips in play, the Survivor Suit does pretty well and is not a bad place to be in the heat, unless you’re stuck in traffic — in which case nothing really helps — or when the temps start heading into the 90’s.
As the summer kicks in here I might come back with a follow-up to see how much heat I can stand when wearing the Survivor Suit.
Water Resistance
Up to this point, everything has gone rather well for the Survivor Suit. It is comfortable and it’s surprisingly good in the heat.
Water resistance though had yet to be tested; I kept promising myself I would get out in the rain and ride with it but it was either too cold or the timing was wrong (or I just was lazy).
I really wanted to evaluate this aspect of the suit, so I developed a plan to make my own rain. I set up a garden sprayer on a hose and placed it in front of my bike in the driveway.
I then proceeded to suit up and sit on the bike while being sprayed.
Not exactly a scientific test but once I sat down on the bike, I did feel like I was riding through a heavy rain.
I was getting pretty well coated in the artificial “rain” and for the first few minutes, all was well. But after that, I started feeling a cool sensation in the crotch.
After another minute or two, I could tell I was really starting to feel some wet shorts.
After a few more minutes I stopped the water and removed the suit to evaluate what had happened.
The arms, torso and lower legs of the suit were nice and dry inside but the crotch area was soaked. It appears that water tends to pool in the crotch when seated on the bike.
As the water pools up, it ends up resting on the lower portion of the main zipper. Even with the sealing type zipper the water eventually finds a path through it and starts flowing inside.
This is unfortunate, but not entirely unexpected. While I was researching one-piece suits I found that this sort of leak is not uncommon and not just limited to the Joe Rocket Survivor Suit. Still, it is a disappointment.
A vinyl rain suit like would be in order if one anticipates riding in serious wet weather.
Conclusion
The Joe Rocket Survivor Suit performs better than I had expected, especially for the price. It looks good and it’s comfortable in a wider variety of temperatures than I anticipated, especially if the leg zipper vent system is used.
The included insulating liner does help in the cold and it can be used easily enough, as long as you figure the suit sizing accordingly.
The protectors are also adequate and can easily be upgraded if you’re so inclined.
The lack of hip protectors or provisions for such is a bit of a let-down, however.
Also, the fact the Hi-Viz option is not available on all sizes of the Survivor Suit is disappointing.
The water leaking into the crotch is perhaps the biggest disappointment.
Even if you consider that this is a difficult problem to solve for most one-piece suits — even expensive suits — it’s still a shame that the Survivor Suit can’t manage more than a few minutes of rain before leaking.
Overall I like the Survivor Suit and I plan on continuing to use it.
The convenience of just zipping it up over my regular clothes and heading to work (or to play) is a real advantage. I should mention that I can manage to squeeze the entire suit into my Shad 37 liter top case (review) without much effort, so it’s easy to pack as well.
The feeling of security that comes with being wrapped up in a one-piece suit like this is very nice; in fact, it’s nice enough that you shouldn’t be clouded too much by the negatives.
I think that for the price, the Joe Rocket Survivor Suit is a very good value for someone wanting to get into a textile one-piece. I will, however, be on the lookout for a waterproof rain suit to throw over it just in case.
|
wBW Product Review: Joe Rocket Survivor Suit
|
|
|---|---|
| Manufacturer: Joe Rocket | List Price (2014): $399.00 to $414.99 |
| Colors: Black, Black and Hi-Viz Neon (regular length only) | Made In: China |
| Sizes: S to XXL (Short sizes not available in Small) | Star Rating (1-5):  |
| Review Date: April 2014 | |
Note: Item provided by a retailer, distributor or manufacturer with these Terms and Conditions.
Owner Comments and Feedback
See details on submitting comments.
From “K” (June 2014): “The zippers. Whenever I look at reviews of one piece suits I always check out the zippers first. The Aerostich system is the best, easiest to use. I can put on and take off my ‘Stich while standing up.
The only other suit I have ever found with the similar type of zipper system was a Fieldsheer one piece I found on EBay years ago. That suit was nowhere near the quality of the Aerostich product. I found my current suit on EBay.
The previous owner who lived in Alabama crash tested it for me before he sold it. It took hours and hours to wash the road tar off of the suit and even longer to wash out the copious amount of Dawn dish washing liquid that I used.”
From “J.E.” (June 2014): “I bought the Survivor last October just before a trip from my home in the northwest Georgia mountains to Orlando AIMExpo and Daytona Biketoberfest. Temperature was in the 30’s when I left.
I figured I’d have to change to mesh gear before Orlando, but the big air vents made the suit comfortable in the high 80s. As long as I was moving; but even mesh gear is too hot for stop-and-go traffic in Florida.
I ride year round. This suit has kept me dry during some heavy winter rains. Like you, I experienced the crotch leak but, really, I’ve had worse problems with so-called waterproof gear from FirstGear and Tour Master.
My only real complaint with the Survivor is that it is still a struggle to put it on.
Step into the legs and it is very difficult to pull the top up over your shoulders (because the crotch of the suit is pulling down). Aerostich must have a patent on their full-length zipper. Otherwise, I can’t imagine why Joe Rocket used two zippers.
I applaud the level of detail in your review. Overall, this is a terrific suit for the money.”
From “M.S.” (June 2014): “I picked up one of these suits last spring in the Hi-Viz and concur with the review. However, I’d like to reinforce the section on sizing.
Sizing of a one piece suit is critical, and you should be prepared to send the suit back if necessary for a different size. I have worn a Joe Rocket textile jacket for 15 years in size Large. I’m about 5′ 11″ and 185 pounds.
My build is generally athletic with broad shoulder a 34 inch waist and a 32 inch inseam.
I ordered the suit in size large and it fits me perfectly except for the shoulders. I can not comfortably wear the suit with the liner, as it’s too snug.
I can struggle into it without the liner, and find it ok to ride in, but the donning process takes far to much effort. Unfortunately, I waited too long after I bought it try it out and am stuck with it.
In other respects, I think the suit is excellent value if you can find one that fits properly.”
From “J.W.” (June 2014): “I have one and agree that it is a great value. I also use electric gear and that works well.
The suit is greatly enhanced with a generous application of Camp Dry.
I used two cans applied over four sessions and stayed cozy and dry during the winter wet in South Carolina. This suit is much better at keeping one dry than the others with the waterproof membrane.
The G-Tex types do not allow perspiration to evaporate as advertised.
I am sure Aerostitch makes a quality garment but the waterproof membrane absolutely fails as a useful feature for me. Air flow is good without ballooning.
A crash in January revealed no tears or abrasion marks and I can still use the Survivor with confidence and comfort. Worth every penny.”


