As I mentioned in my Motorcycle License Plate Stash Box review, there’s a serious lack of places to mount, store or hide things on my 2003 Suzuki DR-Z400S.
This is a big difference compared to my other adventure bike, the 2002 BMW R 1150 GS (report).
One big question with the Suzuki is this: Where in the heck do I put the tools I’ll need for our next Trans America Trail ride?
Being a retired Auto Tech (and traveling with my friend Glen) I have to take some tools along, but I’ll really have to pare down the amount to a minimum for this trip on the DR-Z400S.
The installation of the IMMIX Racing rear luggage rack (review) solved my luggage carrying dilemma, but for the life of me I couldn’t come up with a place to carry some basic tools.
The Motorcycle Tool or “Stash” Tube
During last year’s Trans America Trail ride, the left side case of the BMW was packed with tools…99% of which we never used.
My buddy Glen carried more tools stuffed in a plastic tube that was bolted to the front down-tubes of the frame on his Kawasaki KLR650.
He had an extra one of these tubes kicking around in his “man cave”, so he gave to me to mount on the Suzuki for this year’s ride, but the exhaust passes in front of the frame on the bike so that location just doesn’t work.
Glen is a self proclaimed cheapskate. If there’s a cheaper or cheapest part or item out there, he’s bound to find it.
Now it’s fairly easy to find tool tubes designed specifically for a motorcycle for around $20 each (try the Tool Tube store).
Or, if you’d like to go crazy, you can also buy a chrome-plated metal “stash tube” designed for Harley-Davidson motorcycles for…$169.95!
But I have to hand it to Glen, because he found a pair at, of all things, Agri Supply, a farm equipment retailer, for 5 bucks each. They’re called “Manual Canister, Large with Neoprene Seal”.
Now to be fair, I should mention that if you buy the $20.00 motorcycle tool tube, you also get a drill bit and some mounting hardware. When you spend 5 bucks, you’re on your own.
The basic construction of the tool tube — no matter the price — is the same though. It’s made from “High Density Polypropylene”, according to the description.
A tool tube is designed to hold documents or an owner’s manual or instructions for towed or PTO-powered implements or even planting instructions on tractors and farm equipment.
But at the bottom of the product description, there’s also a mention that the tool tube works great as a small tool carrier for motorcycles.
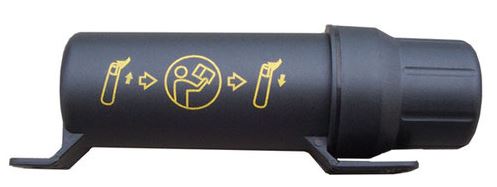
And Fuel Bottle Carrier…
And by the way, we also confirmed that the tool tube is just the right size to hold one of those small Primus fuel bottles found in camping supply stores.
At 12″ (31 cm) long with a 3.25″ (8.25 cm) diameter and a screw-on cap with a weatherproof gasket, the tool tube comes with a hefty mounting flange molded on to either end with three 5/16″ (8 mm) holes at the cover end and an elongated 5/16″ hole on the other end.
The holes are spaced 10.5″ (27 cm) apart, center to center.
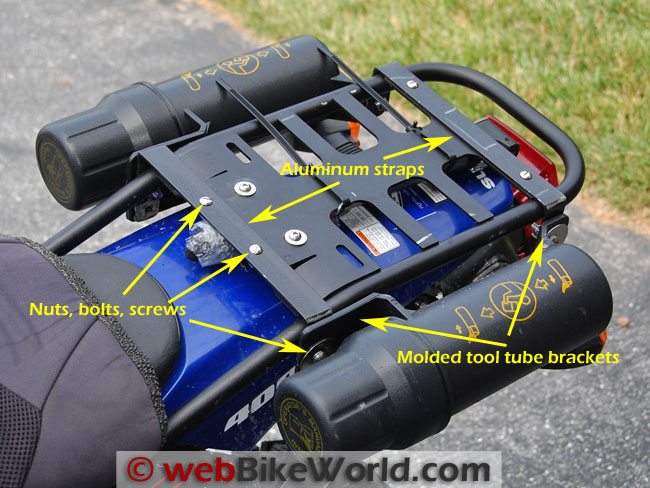
Mounting the Tool Tubes
The tool tube (or tubes) can be mounted just about anywhere you can find the space on a motorcycle.
I had found some unused holes on the rear sub-frame on the sides of the rear fender of the Suzuki DR-Z400S, but they simply didn’t match up with the tool tube mounting flanges or fit the shape of the tube itself.
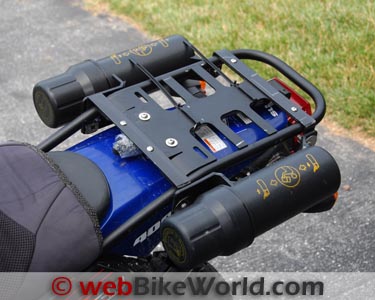
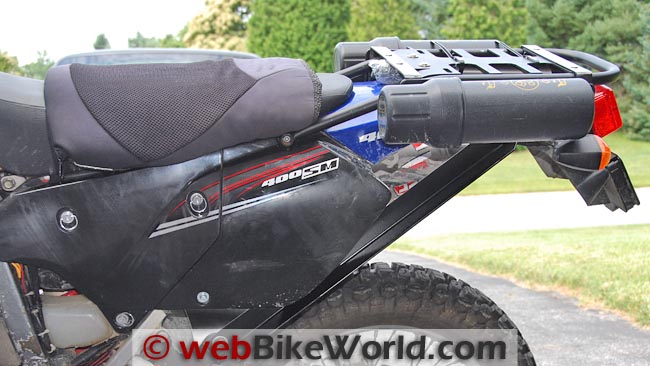
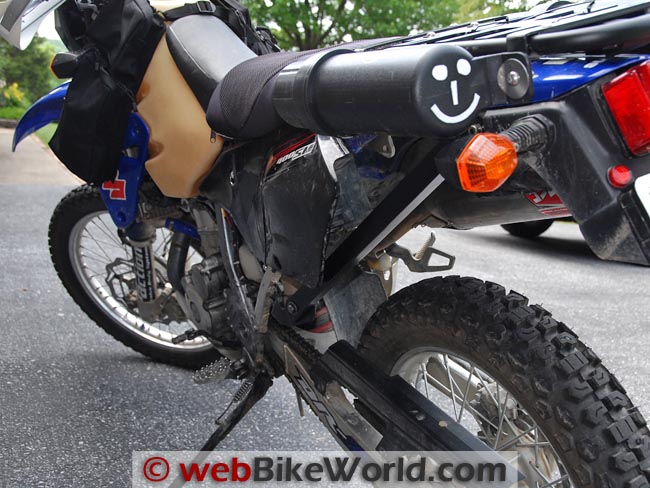
Then it hit me — how about a couple of straps across the IMMIX Racing rear luggage rack (review), bent to a 90-degree angle on the sides? I could then mount the tubes horizontally on either side of the rack.
There was enough room on the rack; the tool tubes wouldn’t obstruct the rear turn signals; they would be out of the way of just about anything else and if I mounted them with the caps forward, I’d be able to open up each tube even when the bike was loaded with luggage and gear.
I usually have some 1″ (25.4 mm) wide by 1/8″ (3 mm) thick aluminum flat stock laying around the garage, but wouldn’t you know it — the supply was used for another project.
So a quick run to the hardware store landed a 3 foot-long (0.9 meter) section and some stainless steel fasteners. Any leftover stock will certainly not go to waste…
I cut two pieces that were long enough to span the luggage rack and then extend down on either side equal the width of the mounting flanges on the tool tubes.
The straps were then bent at 90 degrees on each side in the vice by hand with a hammer tightening up the bends.
The rack already had elongated holes cut in the mounting plate, so it was a simple matter of marking and drilling four holes in the aluminum stock to match up with the plate.
With the holes drilled and some stainless steel screws securing the straps to the rack, the tool tubes were held in the desired position and marks made for the holes to mount the tubes to the strapping.
Stash Box Details
I drilled holes in the aluminum straps to match the mounting holes on the rack and the rough cut ends were rounded and smoothed off for a more finished look.
Both brackets were painted using black “Hammertone” spray paint, and it came out looking pretty close to the powder coating on the IMMIX Racing rack and doesn’t require a primer.
I used this same paint on the bracket for the Multi function volt meter (review) I installed on my BMW R 1150 GS several years ago and the finish is still holding up great, despite a fair amount of exposure to the elements and general abuse.
I then used some 5/16″ stainless steel button-head screws with nylon self locking nuts to fasten the tool tubes to the homemade brackets, along with some stainless steel fender washers against the tool tube mounting brackets to help spread the stress away from the holes.
For fun and added visibility, I cut out some reflective tape to make a pair of smiley faces and stuck them to the bottom of the tube which points to the rear.
These will “light up” when they’re illuminated by headlights and hopefully put a smile on someone’s face.
So there you have it — two tool tubes mounted on a pair of home-made brackets with a minimal of time and cost.
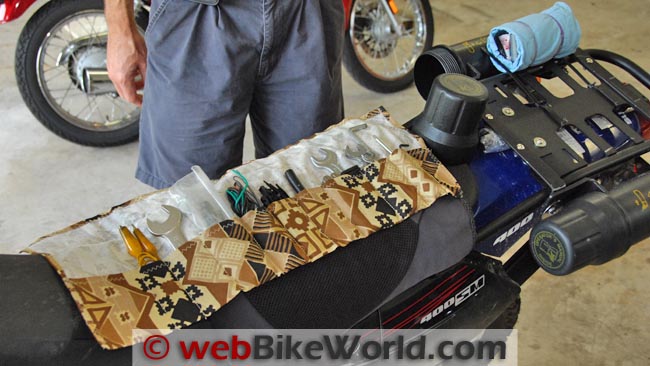
I asked my wife if she would make me a cloth tool roll and it slips nicely into one of the tool tubes.
With Glen as my adventure partner, perhaps I should reserve the other for First Aid supplies!
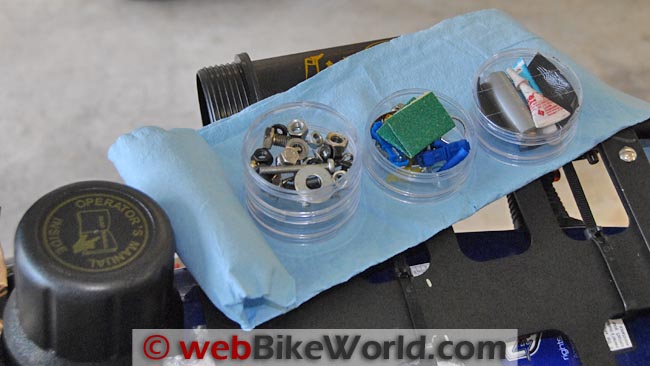
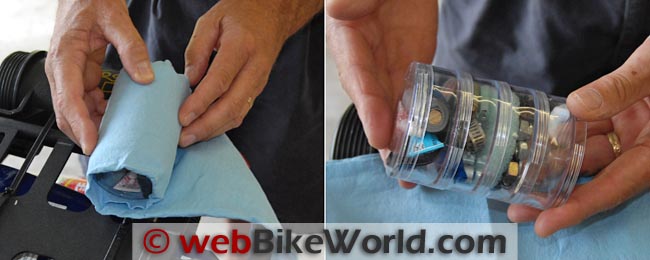
I also found some round plastic parts holders to hold spare hardware. I wrapped them in one of those “Absorber” cloths and stuffed it also inside the tool tube.
Conclusion
Having weather-tight storage for your tools and other items is often a must. If your bike doesn’t have any available space, a tool tube might just be what “the Doctor ordered”.
You may have to fabricate a bracket or a way to hold the tube on the bike…but then, that’s half the fun of “farkling”, right?
Whether you want to purchase them individually or in a “kit” that comes with a drill bit and the hardware is up to you.
Me? I have plenty of drill bits and a visit to the hardware store to rifle through their stainless steel hardware selection is always fun.
I paid $4.99 for each tool tube (plus shipping). A smaller tube is also available for $3.99; it’s 12.75″ (32 cm) long by 2.5″ (6 cm) in diameter.
More wBW: Suzuki DR-Z400S Blog | Motorcycle Luggage Reviews
Master Listing of All wBW Motorcycle Product Reviews
Owner Comments and Feedback
See details on submitting comments.
From “M.S.” (July 2013): “May I suggest adding a large screw clamp or two to your tool kit. Looks like the Tool Tubes will be the first thing to hit if you go down. Usually brackets break first. A set of screw clamps could stand in for the broken brackets in an emergency.”
From “H.S.” (July 2013): “Looking at the pictures, I can’t tell how much, if at all, the tool tubes stick up above the rack. Do those still fit with the tail luggage you’re packing on the trip?
Other than that question, that install looks amazingly clean. I’ve heard of people using tubes like that before, but that’s definitely the cleanest looking install I’ve seen with them. Way to keep the farkling spirit going on that one.”
Editor’s Reply: I had this photo but didn’t add it, as it is nearly cut off at the top.
But it shows the tops of the tool tubes are about even with the top of the luggage rack. The height could be modified, depending on how far the aluminum bracket is bent. Chris said all of his luggage (stuff bags and a Rotopax gas can) will fit.
From “N” (April 2013): “Reportedly (meaning I haven’t tried it), the printing on the tube can be removed with carb cleaner.”


