High Intensity Discharge (HID) lighting does not use the filament that is commonly found in normal automotive or motorcycle light bulbs.
Instead, the bulb is filled with Xenon gas. The gas is ignited and creates an arc of light from the high voltage.
The amount of light output is claimed to be three times a standard halogen bulb. HID lights burn at a higher light temperature that gives gives them the white-blue appearance.
Note that a ballast is needed to start the HID light burning, because the light units typically need 30 amps or so at startup, which would overwhelm a motorcycle’s electrical system if the lamp was started without a ballast.
The ballast provides the increased electrical current at startup without higher amperage.
This means that in most cases, the HID light and ballast system can work with the bike’s existing fuse and wiring. HID lights take only 5 amps or so after the initial burn.
I’m semi-retired and I have lots of time, so I thought this article might possibly help someone else wanting to do this. So here goes…
First, I got the 4300K kit from Xenon Depot based on my internet cruising. webBikeWorld and Xenon Depot seemed like the best. I am interested in putting a lot of light out there at night due to the many critters on the road.
The “look” was not as much of a concern as getting the most light for the power output. I wanted to make sure I didn’t tax the alternator too much, because my wife and I tour, and use Gerbing electric clothing.
Check out my motorcycle pages for more info.
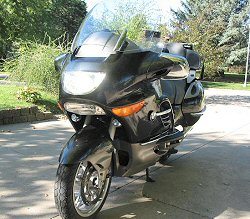
My bike is a 2005 BMW K1200 LT with only 3000 miles so far. My last one was a 1999 K1200 LT Custom. You may notice in the photos on my website that there is also a PIAA installation with an AutoSwitch on my bike.
Those lights are 55 watts each and are tied into the high beam.
The headlight arrangement on the K1200LT has changed from 1999 to 2005. I can tell from looking at my space headlight pod.
I think the 2005 is where the change occurred as the high and low beams are now separate, and the high beam is 65 watts of H-9 instead of the prior 55 watts for both. I don’t know what fuses the ’99 used, but my ’05 has 7.5 amp mini-fuses on 2 separate circuits.
I didn’t want to burn any bridges; i.e, I wanted to make this installation reversible. I have done non-factory installations before and gotten into a mess. Sorry, “plug and play” has seldom been the experience for me.
I wanted to retain the low beam, which is an H-7 bulb. I didn’t see any conversions for the high beam H-9, which is 65 watts.
I have an extra 1999 LT headlight pod because I got a rock chip hole to the front lens on my old bike. The whole unit had to be replaced, costing about $400.
Editor’s Note
Mike installed a 4300K HID (high intensity discharge) headlight kit from Xenon Depot after finding the information on the webBikeWorld Motorcycle Lighting page.
Since motorcycle HID lights are a relatively new technology, Mike decided to be on the “bleeding edge” and he wrote this article on the installation to share with others.
The new 2005 is plastic. I keep all the old parts around, and in this case it has helped me with the conversion.
The ’99 pod door fits the new 2005 headlight pod. I used the old door and kept the new door as a spare. Being able to look at the old pod and decide where to drill was helpful.
Beginning the Installation
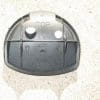
I drilled 2 holes in the pod door. A 5/8 inch hole (or 23mm) for the HID bulb and a 1/2 inch hole for the HID power input. I used a wood drill and drill press to make the holes.
Note on the ’99 headlight pod pictures, there is a factory power fitting that might take the HID H-7 input plug in. If you have that style pod, you would only have to drill one hole, if you can plug the HID into the wiring going into the pod.
From the picture you can see there are 3 wires though, so I expect the high and low beams are both there. Then you probably would lose the high beam if you used that factory wiring to the HID.
Maybe the three way wouldn’t work, or you would have to rewire the whole thing.
Anyway, my 2005 has a completely separate, overdone, Teutonic-style plug-in fitting that is grommet sealed with a spring loaded keeper on it…the H-7 input from the HID kit will not fit into the wiring harness plug.
I took the factory pod power input fitting off to look at it after I removed the left side fairing on the LT for exposure. That in itself is a job!
If you can work in tight places and see up close (a problem for us old guys!), I don’t think you would have to remove the fairing. Especially so now that I can tell you what is up there.
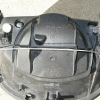
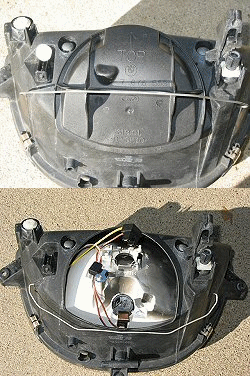
I took the door off the headlight pod, and could see that there is enough space inside the pod for the fittings to come through the drilled holes. The HID bulb was drilled on one side and the H-7 input connector on the other.
The white dots on the photo (left) show where.
The holes need to be above where the wire closer and tensioner snaps into place, and to either side of the back of the headlight reflector for enough space.
Try to put the hole for the HID power input close to the standard H-7 bulb plug wires. I didn’t, and the H-7 plug wires were a little tightly stretched…but it did reach.
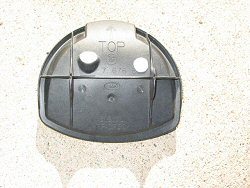
Note on the old LT pod picture prior to 2005 that the factory input fitting is on the left side. My 2005 factory power input into the pod is now on the right.
The 2005 pod cover has a boss on the left side while the old ’99 cover was smooth.
The grommet on the HID bulb wiring seals the hole fine. You have to massage the hole a little with a round file where the connectors go through, but the installation was easy.
I used a small screwdriver, bent the retaining metal back, and released the pins from the HID kit plastic power input fitting.
I drilled the 1/2 hole, put the wiring through the hole in the pod cover, and replaced the plastic H-7 fitting on the pins.
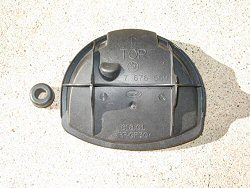
I used an automotive grommet similar to the black one next to the pod cover in the picture.
I think it was a green grommet for control rod linkage.
The one pictured is a PCV grommet. I also put 2 small zip ties on each side of the cover and some silicone as the grommet was slightly loose, and I wanted a strong, water tight seal.
There is enough wiring to allow you to replace the standard H-7 bulb with the HID bulb, and hold it with the factory wire keepers in the headlight pod.
Then you plug in the factory H-7 bulb plug into the HID input fitting, gently stuff it all into the pod and replace the door. Snap the wire keeper up and you’re done.
The LT has an “X” frame just below the headlight pod. I used the doubled sided tape and heavy zip ties to hold the HID boxes up on top of it. Nothing comes anywhere near the fork and there is room up there for a box on each side of the “X” arms.
The wire looms were looped back and forth a few times and zip tied to the same place.
You need to find the fuse box under the seat. Take out the 7.5 amp fuse (unless you want to try it and burn it out first, like I did) and replace it with the 10 amp fuse.
That’s all there is to it!
Looking at the bike, it looks stock until you turn the power on. Plenty of good light! I ran all day Sunday and nothing bad happened yet. The BMW has a knob to raise or lower the headlight beam.
I suppose I will have to play with that to keep the oncoming cars happy. I rode around in the darkest places I could find last night.
Everything worked super, and I only got 2 on-coming cars that flashed their high beams at me. I think the conversion is definitely worth it. I just hope I don’t get ticketed for it, because it isn’t stock.
A lot of the high end new cars have these, so with time I doubt it will be a problem.
Publication Date: October 2004
Owner Comments and Feedback
See details on submitting comments.
From “S.M.” (10/09): “I was reading your article and I thought I would make a slight correction. In the third paragraph, is stated:
“The ballast provides the increased electrical current at startup without higher amperage. ”
What’s not clear is if this is part of the “editor’s note” or if it is part of the original article. Regardless, this statement is completely wrong. First, current and amperage are the same thing. The current of a circuit is measured in amps, thereby the amperage of the circuit IS the current.
Secondly, this is not the function of the ballast.
All lights which utilize arcs or energized gas (HID lights, fluorescent lights, etc.) do not have natural resistance like an incandescent light.
They will accept as much current as the power supply is capable of supplying and in most cases, this is far more current than the light bulb is capable of handling, thermally.
The end result is thermal overload (and in most cases, explosion).
Therefore, the main purpose of the ballast is to LIMIT the current while the lamp is running. Older ballasts (in fluorescent lights) use a transformer for this, but modern ballasts are solid-state, using small, efficient semiconductors.
As you mentioned, gas discharge lights also require large amounts of current in order to start up. Older ballasts used “starters”, or capacitors to do this. Modern ballasts do the same thing, usually with capacitors as well.
However, a capacitor can only store energy – it can’t create energy that is not there – therefore, when the HID light starts up, it will draw a large amount of current for the first few seconds it is energized.
I’ve measured aftermarket automotive HID lamps that draw in excess of 20 amps for the first few seconds.
You should ensure the bike’s wiring can handle this and if it can’t, you might want to consider replacing it with a fused, direct run to the battery, and insert a relay to switch it, controlled by the original headlight circuit.”


