Outfitting the Versys
The Kawasaki Versys Story
- Part 1: Kawasaki Versys Introduction and Review
- Part 2: Luggage and Accessories
- Part 3: Windscreen
- Part 4: Accessories for the Versys
- Part 5: New Tires for the Versys
- Part 6: Oxford HotGrips on the Versys
- Gear: Zeta Handguards and XC Deflector Kit
- Gear: FAMSA 260 Tank Bag & Pannier Set
- Versys Specs: Kawasaki Versys Info and Specs
- Versys Owners: Owner Comments
- More: Talon T-3300 Motorcycle Alarm Installation
Windscreen
The Kawasaki Versys motorcycles shown in the photos have been outfitted with Genuine Kawasaki Accessory Vario Windshields, which are manufactured by MRA for Kawasaki (See the wBW Motorcycle Fairings & Windscreens page).
This windshield, similar to other MRA shields, adds an adjustable top spoiler.
This allows height and air flow adjustments to be made by the rider.
Comparatively, the replacement shield is about 1.5 inches taller and about 3 inches wider than the stock shield.
However, givens its shape, and the spoiler, this accessory shield does an effective job of creating a larger clean air pocket, especially at touring speeds — bug count has been significantly reduced as a result, which is always a good thing, even with a full face helmet.
Tank Bags
Two Marsee 20 litre Teardrop strap mount tank bags, originally purchased while in Daytona for Speed Week earlier this year, fit perfectly on the Versys gas tanks.
The simple steel and flat surface of the tank and the sides of the fairing will allow a variety of bags to be used, keeping in mind handlebar clearance and integrity of the mounting system used.
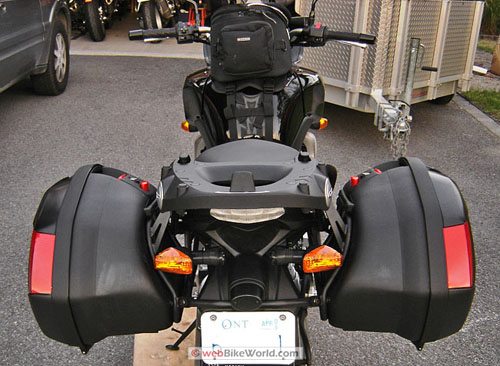
For expediency to satisfy commuting and travel purposes, we mounted our aging GIVI Voyager soft saddlebags that have been used on a variety of motorcycles over the years.
These versatile units mount in a couple of minutes, thanks in large part to their simple strap system, the under-frame exhaust system and easy access to the rear trellis frame, which provides ideal and safe mounting points.
The bags, along with our also aging tail bags (Oxford and Travel Bag brands), provide lots of storage space and while the increased weight is noticeable, the Versys remains stable at all times.
Where to Buy Kawasaki Versys Luggage
Check Reviews & Prices on AmazonSee More: Motorcycle Luggage, Motorcycle Accessories, Motorcycle Helmet
GIVI Luggage
Acknowledging that patience is truly a virtue, we had been waiting with some frustration for the GIVI accessory items being produced for the Versys to become more widely available. Another owner snagged the first set, so we had to wait a bit longer.
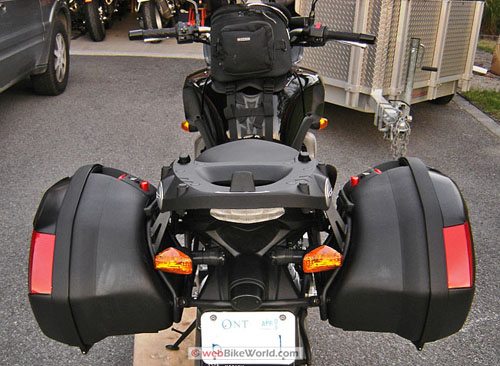
With patience rewarded and the kits exchanged across the counter, we have now gotten both GIVI kits installed on the Ebony model.
To allow for a progressive build-up and evaluation, first up was the Monorack kit.
The whole effort, no thanks to the poor instructions, went on in about 30 minutes. The kit is fabricated of mild steel, oval in shape, with a matte black powder-like coating.
Although it blends in rather well, broader oval tubing was used, rather than round tubing that is used for the companion PLX bracket kit.
Appreciating strength concerns, using the same round tubing for both kits would have allowed the accessory pieces to better blend into the tubular trellis frame for far better aesthetics.
With the Monorack installed, a new GIVI V46 Monokey trunk previously ordered was snapped into place.
Anything larger would overpower the looks of the whole setup and based on the age old law of space versus utilization, could possibly result in an unstable load.
From a versatility perspective the trunk gets used between virtually all the fleet, so it’s a good investment.
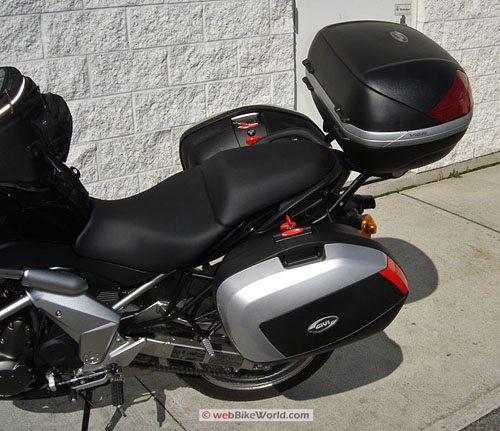
Installation of the second piece of the GIVI ensemble, the PLX447 kit, has just been completed as well. This kit is fabricated, except for the mating brackets, of round tubing, with the same coating as used on the rack kit.
We did not even utilize the instructions for this installation as it’s a relatively straightforward exercise. As the two kits need to be co-mounted, it is a good idea to loosen off the already installed to-be-shared Monorack bracket mounts.
Outside of exchanging some of the rack mounting bolts for longer items (supplied) to accommodate the second kit brackets, no problems were encountered.
It took longer to remove and reposition the signal lights using the supplied pieces than it did to install both bracket kits — go figure.
Note: the pictures provided should be used when repositioning the signal lights as the brackets can be mounted with either an inward or an outward orientation; to clear the PLX bags when they are mounted, the signal lights must be installed with the bracket oriented inwards on either side.
We did find out that with repositioning the lights, the left hand signal light wire is now just a tad short. It was stretch to get it connected (the left and right signal light harnesses, although identically wired, have keyed connectors and thus cannot be interchanged — darn!).
With this lesson learned, and for a more permanent installation, an extension harness will be fabricated, or a shortcut hole will be drilled through each side of the lower rear fender at signal light level.
This will allow the wires to be pulled straight through and run up to under the passenger portion of the seat, where the wiring plugs are located.
Note that access to run the signal light wires up between the rear fender and the side panels into the access point is very narrow and it takes a bit of patience.
Once done, we then reviewed the minimalist instructions and discovered that all steps had been covered, albeit in a slightly different order and manner and what should have been left over, was.
As only the new PLX style of side case can be used with this bracket, a set of V35 saddlebags, with a silver insert, were used for mounting and photography purposes.
This whole ensemble turns the Versys into what we are terming the “mini” Adventure. Said other Versys owner who received the GIVI kits had already installed the complete set of luggage and departed on a trip.
Consequently we are anxiously awaiting his return to see how it all worked for him.
Awaiting installation is the TomTom Rider GPS.
We have both a handlebar and a brake/clutch assembly mount for the unit, and we shall see if the claimed accessory line is to be found under the front fairing assembly, which will make this job a bit easier.
Where to Buy Kawasaki Versys Luggage
Check Reviews & Prices on AmazonSee More: Motorcycle Luggage, Motorcycle Accessories, Motorcycle Helmet
Kawasaki GIVI Accessory Information
All the GIVI components can be ordered from GIVI Canada or from your local Kawasaki dealer as a genuine accessory.
Installation options allow for: a top case mounted using the FZ447 Monorack kit; two side cases using the PLX447 kit; or, mounting of three cases using both kits.
Note that while the provided instructions are minimal and typically confusing, the simple pictures that are part of the instruction set should allow most installations to be successfully completed.
We have already done up some more detailed installations instructions for other Versys accessories and passed them back to the Kawasaki Canada representative for their use, and hopefully posting and sharing – we will likely do the same for these kits as well.
Each GIVI PLX mounting kit is specifically tailored for the individual motorcycle to provide a much closer fit than other installations.
This approach also serves to reduce the overall bracket and bag combination width, improving aerodynamics and appearance.
A MONOKEY top case is recommended for use on the Monorack as these are oriented more towards motorcycle use with a wider variety of styles and sizes.
For the side cases, a PLX style bag, like the new V35, must be used on the PLX bracket; older style side cases will not work.
The V35 side cases can be keyed-alike to the GIVI MONOKEY or MONOLOCK top case using a GIVI Z228 lock cylinder kit, which is sold separately.
The GIVI V35 bags can be ordered with either the Burnt Orange or Ebony colour matched panel insert — a nice finishing touch. The Low Gel Seat, as identified earlier in the article, is also available from Kawasaki and comes embroidered with the Versys logo.
Other accessories are listed on the UK website and our dealer is hoping that Kawasaki Canada will add them to the availability list as well.
Twisted Throttle is also listing the SW-MOTECH Quick-Lock Contour Carrier for the GIVI V35 PLX cases and the Quick-Lock Sideracks for GIVI, Hepco-Becker and Krauser sidecases.
Accordingly, we are pursuing this avenue as a possible option route for the Burnt Orange Versys.
Master Listing of All wBW Motorcycle Product Reviews
Where to Buy Kawasaki Versys Luggage
Check Reviews & Prices on AmazonSee More: Motorcycle Luggage, Motorcycle Accessories, Motorcycle Helmet
Owner Comments and Feedback
See details on submitting comments.
From “S.H.” (04/11): “I enjoy your site and was wondering what you needed to mount the v35 cases with the SHAD top case to the Kawasaki Versys.
I have a SHAD top case with their mount based on your review but I want to add v35 side cases. Can I get away with just the PLX447 without the kit or do I need the adapter kit like I do not have a top case. Thanks for your help. P.S. 2008 Versys.”
HBC’s Response: In the original Versys and SHAD luggage articles, I had alluded to the possibility of using the GIVI V35 side cases along with a SHAD top case.
But in the end mixing the two sets of mounting brackets wasn’t going to work, even though initially it looked like it could be done, at least not without some serious machining or welding.
However, what I did have installed before both Versys got traded, was the GIVI FZ447 and the PLX447 kits that form a single integrated mounting system for a top case (Givi or otherwise) and the V35 cases.
So short answer is yes – both kits are the optimum for a Givi solution, that will still let you adapt the carrier for another top-case, like SHAD.
The left and right bracket pieces of the Givi FZ447 carrier kit has a top strip welded on, which is drilled for the standard Givi adapter – specific model or the universal plate.
The reason I mention this is that the SHAD metal plate that came with your top case kit can be mounted on almost anything given its multiple hole patterns and as such, it is very adaptable.
I actually still have the (now surplus) Givi FZ447 and PL447 kits on the shelf and once I took another look at the pieces, I think the metal SHAD plate can be bolted on, using the holes drilled on the left and right Givi bracket pieces (although you may have to drill some new holes in the Shad plate).
An alternative, which I used for the first installation, used a rectangular sheet of aluminum that was drilled as the initial plate to bolt to the two Givi side brackets.
With this done, you can drill that piece for whatever pattern you want to match the SHAD metal plate and then bolts these two plates together. The Shad top case adapter can be screwed on and the top case installed.
Another option is the SW-Motech Quick-Lock kits for side case, but not sure if there is a compatible carrier kit that can be bolted on as well and they have some unique features.
There are a couple of other manufacturers that make basic side case frame kits for the Versys and most have adapters to fit various bags, like the v35.
Finally, coming back to SHAD, an alternative which you have possibly investigated seeing as how you already have the SHAD Top Master kit mounted is to get the companion SHAD Side Master kit for your Versys.
I never got the chance to install and use this kit, but it gets good reviews and it would provide a more integrated system and more capacity if needed (around 42/43L) over the v35 items. Anyway, short answer made long, hope this helps.”
From “E.S.” (2/09): “You have a very interesting website, please keep up the good job. I can easily spend a couple of hours (that I don’t have) reading your articles.
I have recently bought a Versys, and now while waiting for the spring I’m thinking of different ways to equip the bike.
I have read you article were you test the FAMSA tank set system 260/7 on the Versys. I think it looks good and I presume that the function also is good.
I plan to buy the tank set but since I have to order it from England (live in Sweden – Scandinavia) I must be sure that everything works out fine because it will cost me too much to return it.
You write that the bag fits the bike rather good.
Could you elaborate on the fit, does it fit with no adaptations at all? Do all the straps, hooks/catches etc. fit, or do they have to be shortened or modified in some way? Is it easy to mount and dismount the bag/bags?
FAMSA is selling a custom fit tank bag for the Versys called FA244/48 Kawasaki Versys 650 Enduro Max Tank Bag. Do you happen to know if it is possible to connect FAMSA’s side panniers to the FA244/48?”
HBC’s Reply:
1. Regarding the FA244/48 – I had spoken to the US retailer about the new bag for the Versys early last fall, when it was just released, as he said they were in stock.
However, he did state that the new bag was just the tank bag and mounting base and that it did not have the fittings for the tank pannier or side bags, which he knew I was hoping they would produce. So, from pictures I have seen, this bag would not be able to have the tank pannier bags mounted to it (no zippers).
2. The 260/7 tank set sold for the R1200GS is (virtually) a perfect fit on the Versys and if the bag is located relatively forward, the cutout for the gas cap sits just where it should.
The tank bag itself works really well on the Versys and after using it over a longer period of time, the only observation is that the tank bag is about one inch wider than ideal. The sides of the bag and the handlebars will touch when turned lock to lock, but this situation is not severe unless you have other equipment mounted on the handlebars.
I have a Garmin zumo 550 on a RAM mount on the left handlebar control and it pushes up against the tank bag if the bars are turned sharply to the left or when the steering lock was used. But again, it was a tolerable situation for me.
Depending on what is in the bag, it may or may not be an issue.
3. Adaptations
a. the front neck strap and back hook straps work without modification, other than adjusting them for the proper fitment front to back.
The front neck strap will loop around the steering head and behind the small tang under the steering head and radiator, so that is not an issue.
The back straps also work well, as the small hooks can be mounted at the rear of the tank and they will sit flat, so they do not interfere with the seat or anything else. The tank pad, as designed, works a scratch protector for the tank when the bag is not being used.
b. The bottom mount can be used directly on the mid-engine brace that runs horizontally across the side of the engine – it is perfectly located for this use.
You can use the original item or use a short length of nylon strap with plastic strap adjusters.
On one Versys I used the original strap, on the other one, a short length of strap was used, both keep the bottom of the tank pannier bag very secure.
c. The original Y-strap can be used from the kit by re-adjusting the lengths of the nylon straps.
But a better solution is to remove it and just use a single long piece of nylon strap (similar to the original strapping) and run it from the top mounting point down inside the side fairing piece, between it and the small diameter frame tubing and then out the front bottom to the forward tank pannier mounting point.
As both ends have plastic adjusters, this is the easiest way to secure the bags using these two points.
d. Outside of the minor width issue of the main tank bag, I have had no problems with using this tank set on the Versys and the setup gets very positive comments no matter where we are.
The tank panniers can be removed in about one minute flat (depending on how secure the strapping is) and the tank bag just unzips from the tank base when not needed and only needs to be unzipped about three-quarters of the way to allow it to be pulled up for fueling up.
4. The tank set is not ‘perfect’ as it wasn’t specifically designed for the Versys, but its the closest fit I have found in adapting something like this.
There are other separate tank pannier kits out there, but nothing works as well, or looks as good as the FAMSA tankset.
5. On a related note I do know that you can also order a tank pad and tank pannier set, without the tank bag itself. I bought one of these to use on the second Versys, as we already had two of the original 260 tank bags.
I hope this information helps somewhat…and that your accessorizing goes OK, the Versys is a superb motorcycle and with a few good accessories can do even more. Let us know how it all works out.


