My wife Sue had bought a set of Personal Mobile Radios (PMR) with some headphones and microphones for our motorcycles.
We had great hopes that we could talk to each other during runs as we quite like each other really and on a long haul, it’s great to keep in contact using both sound and vision.
The PMR kit was a pain to fit into the helmets, it was a pain to get everything connected after mounting the bike, and having the PTT (Press to Talk) buttons and leads all over the place was also not my idea of fun.
Out on our second run after installing the kit, I threw a hissy fit when the mike kept on coming unstuck from the chin bar on my helmet, but, however, still managed to well and truly glue itself to the liner padding. I threw a further tantrum a few weeks later when at the start of a 536-mile haul, the PTT button stuck on. I ripped the kit out of my helmet and categorically refused to use it ever again.
A couple of weeks later, the kit went back into the helmet. The wires I had pulled out during my tantrum were re-soldered and the thing was just about working OK but range was pretty abysmal and, in fact, yelling would have been a preferable means of communication.
Final act: We’re on the way back home from the Ace café ‘Brighton burn-up’. After stopping for a smoke, I’m following the group and am about ¼ mile astern. The radio crackles into ‘life’ (and I use that term advisedly): “ssqqrrkk, at the zzzzzzzzziiip” eh? What? “ssqqrrkk ssssssssspetrol”.
Right, glad that’s cleared that up then.
Sailing round a bend, which is pretty tight (when you consider that we’re on the A1), I catch sight of the group pulling in to a petrol station, but, as it’s on the brow of a hill and the slip road is right on the apex of the bend, I have no hope of slowing down in the drizzly, greasy conditions — at least not if I want to stay on the bike that is.
Bloody intercom. Bloody crap. Bloody petrol. Bloody A1. Bloody wet.
Right, that’s it. Kit binned for good this time. Really.
All in all, the performance of the gear was generally poor with an absolute max. range of about 400 – 600 yards line-of-sight. It wasn’t too expensive, so I suppose the maxim that you get what you pay for applied.
Now, I know that people fit this type of kit and appear happy with it. It may be that I / we were doing something wrong, like not riding up each others exhaust pipes; however, I wanted something better.
After these little ‘hiccups’, I resolved to research the subject and buy a set that actually worked on a motorbike. I know a little bit about comms and as part of my research, I talked to various suppliers and listened to many different claims; some were plainly outrageous, some plainly stupid, some plausible to begin with but generally, little provenance to the ‘facts’ they spouted at me.
After looking at the results of the research, I / we eventually decided on ‘Autocom’ gear and lashed out and bought 2 sets at the NEC show whilst high as kites on caffeine from the really ace Italian coffee kindly dished out at the Moto Guzzi GB Club stand. Know this: Timothy Leary obviously never tried this stuff.
I got the kit home and read how to do it. I assembled it a few times on the bench and re-read the instructions which are very good.
Fitting it to my Guzzi was a doddle. Fitting it to Sue’s Honda was not quite so easy bit still straightforward. I had to take my time fitting it to both of the crash helmets and there was a bit of bad language involved, but that was down to my impatience and overall, it was no problem.
Test time: Sue stayed in the kitchen (she knows her place but don’t tell her I said that) and used only the transceiver, and I went down to the barn about 200 yards away, got on my bike with the engine running, crash hat on and everything plugged-in. We tried talking to each other – after a bit of fiddling with the volume and gain controls, the result was absolute clarity of speech.
I set my mobile phone to hands-free, plugged it in to the Autocom unit and still wearing my helmet, Sue rang me. Perfect. Out on the road, she followed me in the car and we tested it again. Every bit as good as when static. We then did a range test.
Range Tests
We used several ‘methods’ when range testing, however to summarise, here’s what we found on the day:
Weather conditions: clear with sun. Some cloud. Low humidity. Wind of about 10 Knots.
Topography: Our test road has 1.5 mile straight and level section, then over the brow of a small hill, there are a series of 30/40º bends. A mix of mature Beech trees / Hawthorn hedges line either side of the road
Radios: Radio ‘A’ was the hand-held transceiver only and was static. Radio ‘B’ was fully installed on the bike.
Other salient features: Radio / TV mast, about 400 ft. high, approx. 3 miles away.
Range 0 – 1.5 miles: Line-of sight, level ground. transceiver set on full volume. Radio ‘B’ antenna vertical. Radio ‘A’ antenna 45º to the horizontal direction of Radio ‘B’ and at about 45º to the vertical. Very good quality reception. Had to turn both transceivers down to around ½ volume to prevent a little distortion.
Range 1.5 – 1.6 miles: Out of sight, over a hill and around a bend. Transceivers kept at same volume settings. Good quality reception. Very small amount of interference.
Range 1.6 – 1.7 miles: Out of sight. Over hill, round 2 bends. Transceivers set to full volume. Reception 75% totally legible speech. Interference beginning to increase.
Range 1.7 – 1.8 miles: Out of sight. Over hill, round 3 bends. Transceivers set to full volume. Interference increasing. About 50% of speech legible. Remainder interference.
Range 1.8 – 1.9 miles: A lot of interference but surprisingly, some sentences came through crystal clear and perfectly understandable by Radio ‘B’, more so than Radio ‘A’.
Results Analysis
It is very probable that the Radio/TV mast did not help make things easy for the interference rejecting properties of the transceiver.
It was only discovered at the end of the test that Radio ‘A’ (and therefore its antenna) had not been held in the vertical position. This antenna type tends to give a better signal when held at right-angles to whatever it is you are trying to communicate with (there is a fair bit of documentation on the subject to support this) and in the authors opinion, this could reduce the range and quality of reception although it would be making a false assumption to say that it affected one or both sets. Given these constraints, it is possible that a greater range would be possible under other, or different conditions.
It works.
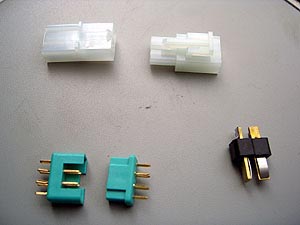
Photos of the Autocom System
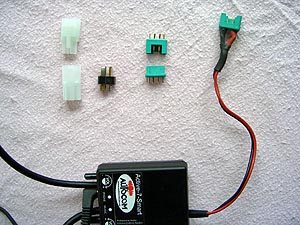
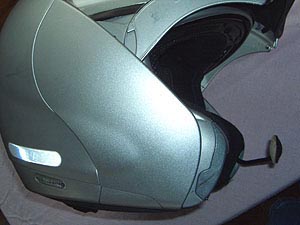
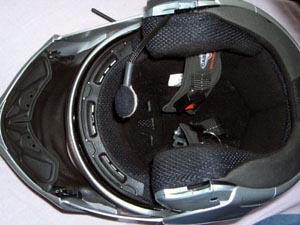
Photo 1: Multiplex connectors Photo 2: Electrical connections Photos 3 and 4 (below): Autocom in Caberg Justissimo helmet.
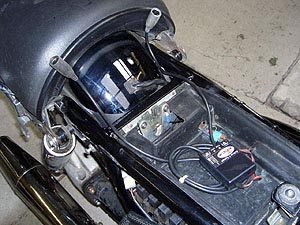
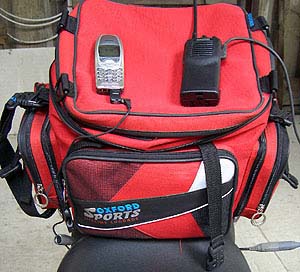
Photo 5: Under seat, the leads stick out, easy to access. Photo 6: Transceiver and cell phone on tank bag. Bag is located on the seat, not the fuel tank.Installing the Autocom System
In the following description, the word ‘transceiver’ means the radio set. I have used the term ‘black box’ for the other bit of gear which is the Autocom unit that provides you with VOX (Voice Activated Transmission) capability and the means to plug in a mobile phone, CD or music player or GPS sattelite navigation gear.
Take a look at the Autocom website. Figure out which set you want. We bought a couple of the ‘Active 7’ kits (£147.00 in the UK, $299.99 list price in the US) and Kenwood TK-series radios. Good solid stuff with a good quoted range.
So many factors, such as buildings, the lie of the land, atmospheric conditions etc, etc, can affect radio range that one can never be quite sure what the range really is, although experience will tell you after a while. Some of the range claims made by manufacturers are for ‘ideal’ conditions which in real life situations are rather rare.
After the kit has been purchased, take some time to lay it out on the table. Read the manual a few times. Connect all the bits together and take it apart again. Picture it fitted to the bike. Take it apart. Play with it all over again.
In addition to the instructions that come with the kit, download any .pdf files you want from the Autocom website. Both they, and the instructions, are really good. Read the .pdf files, read the instructions, and lay the kit out. Again. The instructions were my bedtime reading for a few days.
Motorcycle Installation
Tools & Equipment: Invest in a packet of heat-shrink tubing. Have a soldering iron and some multi-core solder to hand. A pair of snipe-nosed pliers, a wire stripper, couple of screwdrivers and some odds & ends will see the job done.
Power Connectors: Depends on what connectors you have available – see the Autocom recommendations for advice / info. The ones I used were ‘Multiplex’ connectors (the Green ones in Photo 1) which are good for about 25 amps. Small, neat and I had them available in my workshop.
There are another couple of connector types shown in Photo 1, which I have included as examples. You really need a connector so you can remove the Autocom unit from the bike during winter or if you lay it up for a while. Electronics don’t really appreciate moisture!
Autocom give some really sound advice on connector types and methods. I would recommend that you follow them.
Electrical Connections: I made a splice in the rear light +ve cable (see Photo 5). I would have preferred to take a tapping from the fuse box but didn’t / couldn’t be bothered to rip bits off the bike.
Wherever the power supply is taken from – and this is important – make sure it is a circuit that is switched on via the ignition. Make sure an in-line fuses is installed in the +ve supply wire.
The earth (ground) cable is where you see it in the photo. I’m not satisfied with the wiring but it will do for the moment.
Helmet Installation
I fitted the kit into my helmet first. I have a Caberg Justissimo (see the wBW review) and Sue has an Arai. Instructions for installing the Autocom system for a specific make of helmet are available from the Autocom website (Autocom UK and Autocom US).
Helmets with removable liners tend to be the easiest. If we had only thought at the time we bought it (I blame that GB Guzzi Club coffee), we would have taken our helmets to the nice people at the Autocom stand who would have fitted it to the helmets for us. Hindsight comes with 20/20 vision!
It took me a little while to understand the photos in Autocom’s helmet fitting instructions but eventually I got there OK. Sue’s Arai was a bit of a fiddle but all in all, not too bad and the downloaded .pdf file was a big help. The helmet lead doesn’t stick out too far from the rear of the helmet.
Fitting the Autocom Unit, Transceiver and Mobile Phone
The next step is to figure out where the “black box” will be located on the bike.
I looked at fitting it in one of the hard panniers on my Guzzi, with a BMW style plug, or a MIL spec screwed connector to take power into the pannier.
This is a good place for the black box and a mobile phone, but, the main drawback I could see was that the transceiver would be a bit low down – I worked on the assumption that the higher the transceiver then the better reception. I suppose that I should have tested that assumption.
What I absolutely refused to do was carry the transceiver in my bike jacket – have an off and you have something hard and lumpy to fall on, a recipe for a broken something or other.
As recommended by Autocom, I ended up fitting the black box under the seat. In Photo 5, I have omitted the foam padding I wrapped around it for clarity.
My bike has a reasonable amount of space in the tool tray under there and my only reservation was the proximity of the ECU and the possibility of radio interference, however, no problems have been found so far in this respect.
I eventually fitted the transceiver in a pocket of my Oxford bag along with my mobile phone, my reasoning being that my bag comes off the bike and goes with me when I get to wherever I’m going (see Photo 6).
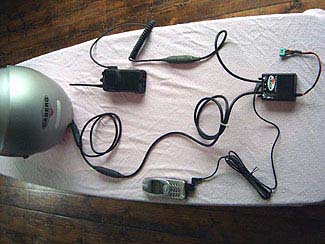
There are two leads from the Autocom unit to plug the transceiver and the helmet into and another socket in the black box for the mobile phone (see the photo at the top of this page).
Not everyone wants to be connected to a mobile phone on a bike but, if by any chance you get totally separated from your partner(s) and are well out of radio range, and you have a voice-activated mobile phone, you can always call them up and arrange a rendezvous or leave a message. Distance is no object here.
Fitting it all together is very simple in practice. Once the kit is installed on the bike, we use the following sequence:
- Charge up the transceivers (the previous night)
- Attach the Oxford bag to the bike
- Install the transceivers and mobile phone in the Oxford bag pockets and plug them in
- Plug the extension lead into the crash helmet
- Put the crash helmet on
- Get on the bike
- Plug the helmet extension lead into the plug sticking out from under the seat
- Ride off into the sunset talking to each other
Conclusion
I realize that this lot may sound a bit daunting if you have never done it before but by taking your time and reading the excellent instructions (and following them) you should have no real problems. If you do get stuck, Autocom are very good at answering queries.
I love this kit. Although of a fairly short range, it really does an ace job and the VOX feature means you are not distracted from what you are doing when compared to fiddling about with a PTT button. It took a little while to adjust to the slight VOX lag but by the second trip, it was automatic. When combined with a mobile phone, distance is no object and I took an overseas call on my mobile without the other party realising I was riding a motorbike at 70 mph.
Just think: when 50 miles from home, you can use the mobile to call ahead and ask for the beers to be chilled and ready. Nice!