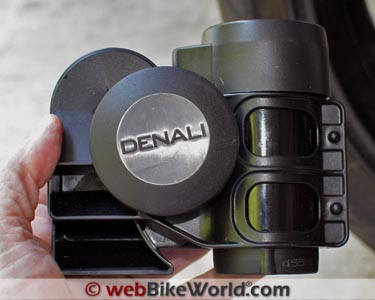

The Denali “Soundbomb” horn comes in two flavors: single and split.
We reviewed the single Denali Soundbomb horn last year.
This “split” version is identical in terms of function, but it separates the horn from the compressor.
They connect with an included thick plastic air hose.
The big single Soundbomb horn isn’t easy to mount however, although Twisted Throttle sells a bunch of adapters.
And, as we discovered, the split version isn’t necessarily any easier to mount.
In fact, finding a suitable mounting location for both the horn and the compressor can make the job twice as difficult.
It took quite some time to figure this out before we developed a workable mounting location for the 2015 Kawasaki Versys 650 (Blog).
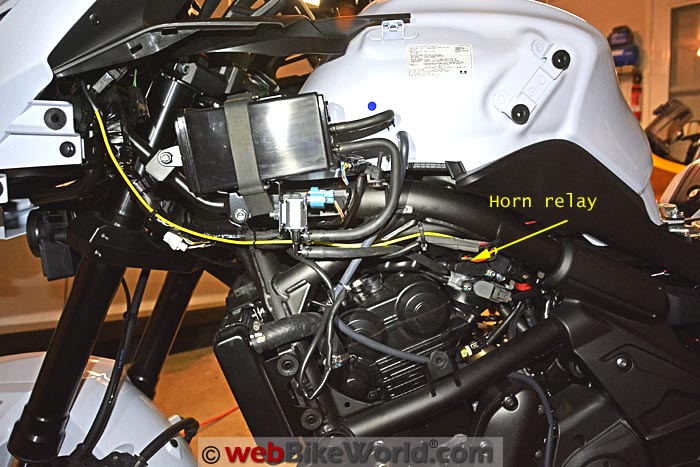
How did we do it? We located the compressor up in an unusual place, inside the top section of the front of the fairing, above the headlights.
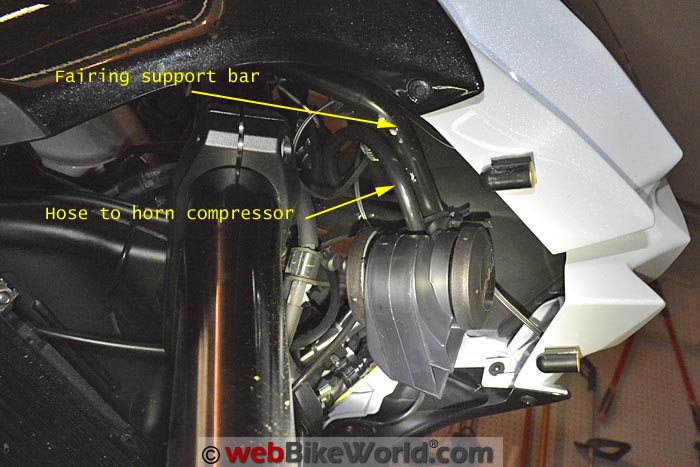
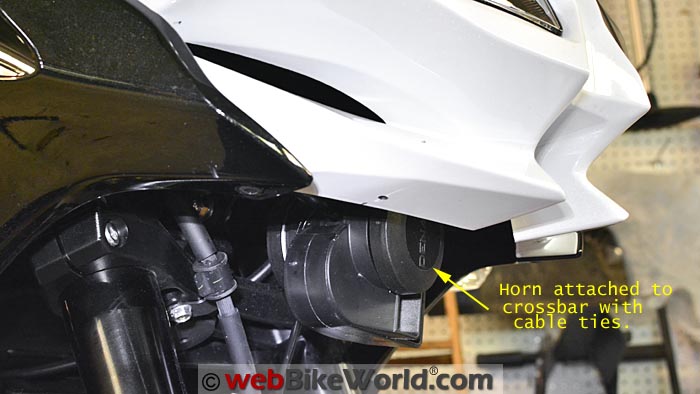
We then located the trumpet module by attaching it to the metal bar fairing support on the underside of the fairing, just above the front fender.
We attached the compressor and the trumpets with two zip ties each and it works fine.
Once we got this all sorted, powering the horn with the Denali wiring harness kit was a piece of cake.
Our split version of the Denali Soundbomb horn scored an identical 118 dB (measured) under the same conditions, holding the sound Extech sound meter a distance of 1 meter from the horn and the split version has a slightly deeper tone than the single Soundbomb horn we reviewed.
So the biggest problem you’ll face — as always — is figuring out how to mount the big Soundbomb, whether it’s the single or split version, although that’s a problem you’ll face with almost every aftermarket accessory horn.
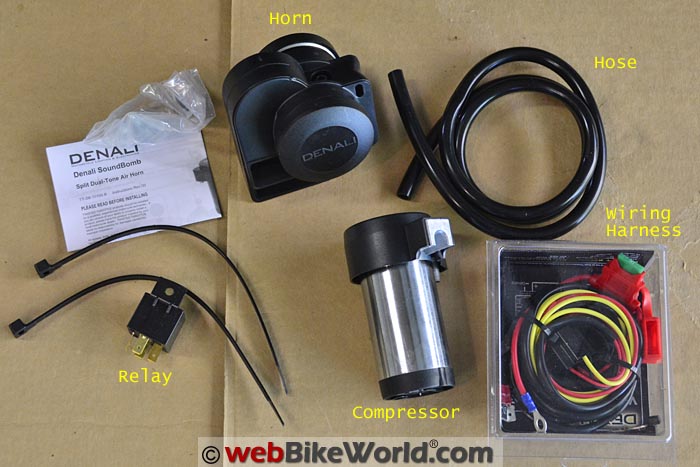
Here’s the Denali Soundbomb split horn kit, plus the additional Denali horn wiring harness. The split version separates the horn from the compressor and they connect with a U-cut-it piece of plastic hose (included). Note that the relay comes with the horn kit but not with the wiring harnessThe Mounting Conundrum
There are dozens of webBikeWorld motorcycle horn reviews, all in search of the ultimate horn. That would be a horn that is small yet powerful; easy to install and can fit anywhere.
The problem isn’t the sound, because almost any aftermarket horn will be louder than one of those awful stock motorcycle horns.
No, the biggest problem you’ll face is finding a place to mount your new horn, or horns, if you’re mounting the high/low tone Fiamm Freeway Blasters (review) or the Stebel Magnum horns (review).
And the Denali Soundbomb horn is biggest of all, so it will take a lot of figuring. It’s so big that we’ve only been able to mount it on two of the four motorcycles we tried.
Other than big touring bikes, most motorcycles are jam-packed with engines, engine management systems, the modern airbox and the rest. It can be really hard to find a spot to fit a big horn like the Soundbomb.
If the Soundbomb looks familiar, that’s because it is — it looks very much like the old Stebel Nautlius (review) that never worked for us in both size and performance.
Buy or Make a Mount?
Twisted Throttle is the importer, distributor and retailer of Denali branded products and they sell a variety of bike-specific mounts for the Soundbomb horns, so be sure to look there first. You’ll save yourself a lot of time and trouble.
But many of their mounts point the business end of the horn towards the side of the bike and we think the optimal location for a horn is in the front of the bike, with the horn trumpets also pointing forwards.
You also have to be careful to have the trumpet openings located so they allow any water that enters to drain away from the horn and that puts another constraint on finding a suitable mounting location.
Alas, it’s not just the Soundbomb horn that has this problem, however.
Dual horns sometimes have an even larger footprint than a Soundbomb horn and flat horns like the Hella Supertone “Pancake” horns (review) aren’t easy to mount either because you’ll need a wide and open location, not necessarily deep.
Bottom line? If you want to mount the horns up front and pointing forward, you’re going to have to expend a lot of brainpower and probably some custom fabricating and lots of fettling to get it right.
But once you have your homework done, the rest is usually easy. And of course, since we’ve done it for you (at least for the Versys), it makes it a lot easier.
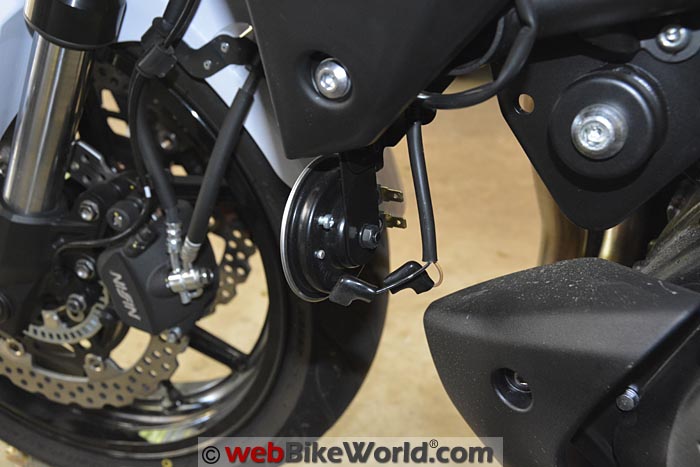
Here’s the stock horn on the 2015 Versys 650. It has the typical “MMMeeeeep MMMeeeeep sound. The two stock wires are detached in this photoThe Denali Soundbomb Split Horn
Just last year, we reviewed the original Denali Soundbomb single horn. It’s a brute that puts out a screamin’ 118 dBA (measured by us) piercing sound.
If you’re interested, here’s the Denali Soundbomb .mp3 file from that review, along with the sound of a failed Stebel Nautilus.
The split version of the Soundbomb horn that we’re reviewing here splits the horn trumpets from the compressor, which may — or may not — make it easier to install.
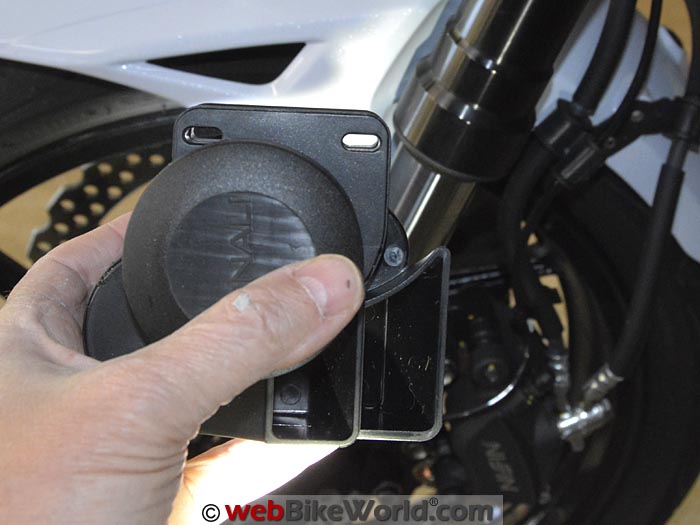
The kit comes with a 1 meter long thick plastic hose or flexible tube that can be cut to length (measure 4 times, cut once) to join the two horn modules.
While splitting the horn from the compressor may help (and, in fact, it does on the Versys 650), it also means you now have to find two mounting locations instead of one. On some bikes, this may be easy, while on others, limited space makes it even more difficult.
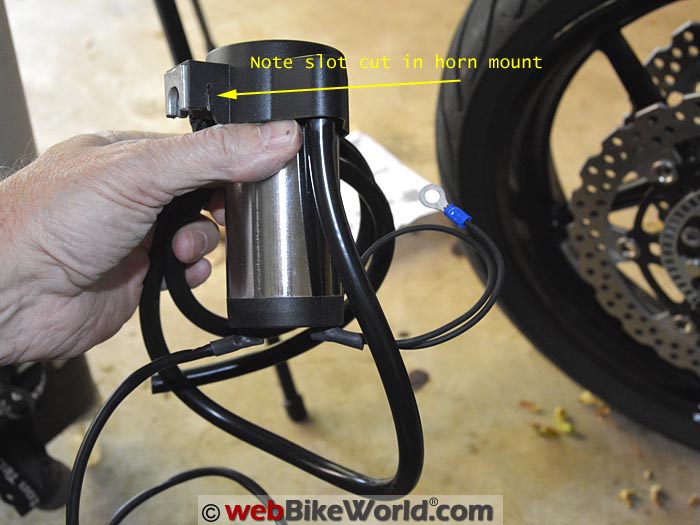
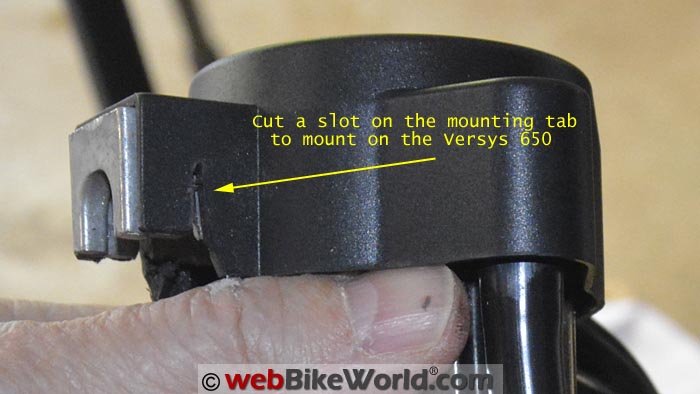
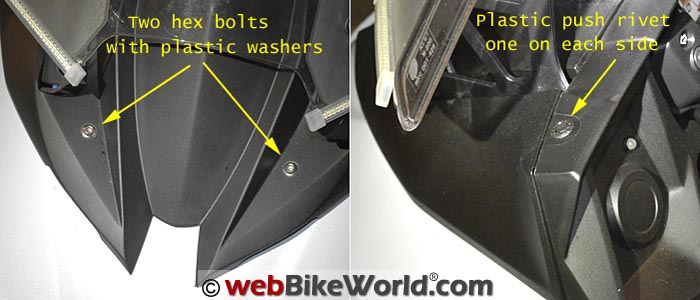
Note slot cut in the horn mount to fit the Versys 650 (see text). Close-up of the slot we cut in the horn mount, using a Dremel with cutoff wheel. Removing the black panel on the new Versys 650: Two hex screws with plastic washers in front and two push rivets in the rear hold the black panel to the fairing. We discovered that with the slot cut in the compressor mounting boss, the compressor can be hung on the metal bracket that runs transverse across the front of the fairing and is easily accessible once the black fairing cover is removed. Corrected horn mounting position puts the vertical cylinder within angle limits. Note hidden wires.Mounting on the Versys
When the 2015 Kawasaki Versys 650 LT webBikeWorld Project Bike arrived last Fall, we knew immediately that the stock horn had to go. It’s actually not as bad as some stock motorcycle horns, and it is pointed forward in an unobstructed location (see photo), which helps.
But, it just doesn’t have that authoritative “Get the *%!#$ out of my way!” sound that a “real” horn has.
You’d think the exposed location of the stock Versys horn on the lower left part of the fairing would be perfect for mounting either the Soundbomb single horn or the trumpet module from the split version.
But the single horn is way too big and the very limited mounting bracket geometry on the horn just didn’t lend itself to any kind of reasonable attachment for the trumpet module.
Looking for an easy way out to mount a more powerful horn or two, we also tried a single Fiamm Freeway Blaster horn, mounted on the stock horn location. But one Freeway Blaster just didn’t sound all that much louder than the stock horn (we tried both the high and low tone Blasters).
Then we tried to mount the pair of the obnoxious-sounding (but attention-getting) Hella Supertone horns and then a pair of the Freeway Blasters, but no luck there either. There just isn’t enough room on the Versys 650.
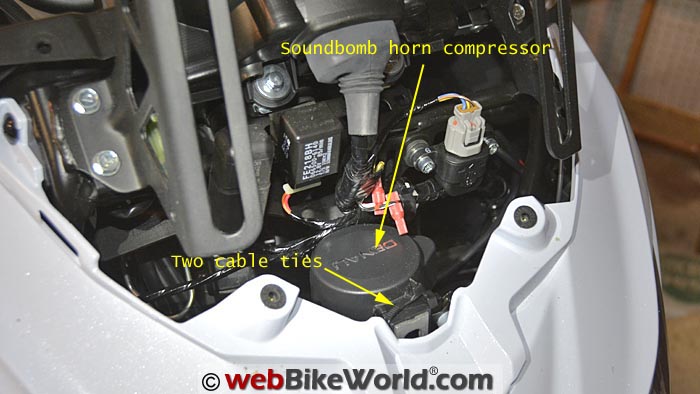
Close-up of the compressor with the slot cut, hanging on the metal bracket and secured with crossed zip ties. The wires are for other accessories. Looking up from underneath, we mounted the separate trumpet horn module on the fairing cross bar using two zip ties and cushioned with a piece of inner tube.Give Up?
We almost gave up when just by coincidence, we removed the black panel that sits under the windscreen and on top of the fairing above the headlights on the 2015 Versys 650. We did this because we were going to move on to the next project, mounting the $50.00 OZ Mini Trail Lights auxiliary lights (review).
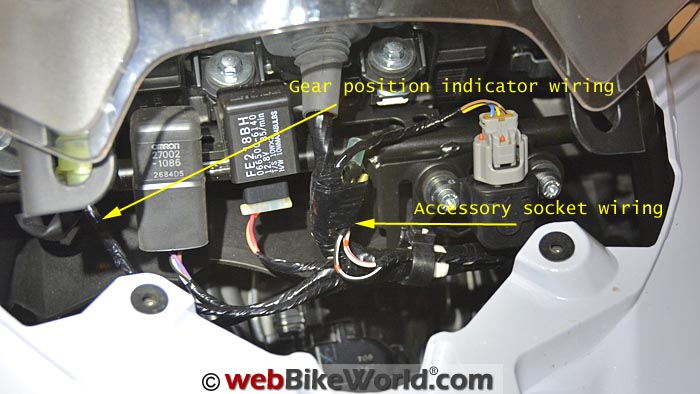
As it happens, the panel is easy to remove, with 4 hex screws and a 4 of those plastic pop-pins. Slide it out from under the windscreen and wow — you have access to all of the wiring in front of the instruments on the Versys.
They even give you a pre-wired power and ground for attaching the optional gear indicator, the optional accessory outlet and down on the left-hand side (right side as you’re looking down into this space from the front) is another pre-wired pair for the optional auxiliary lights.
That means you have easy access to a powered wire (i.e., a wire that gets power when the ignition is on). Perfect for using a Posi-Tap for powering accessories or conspicuity lights and more.
Mounting the Compressor
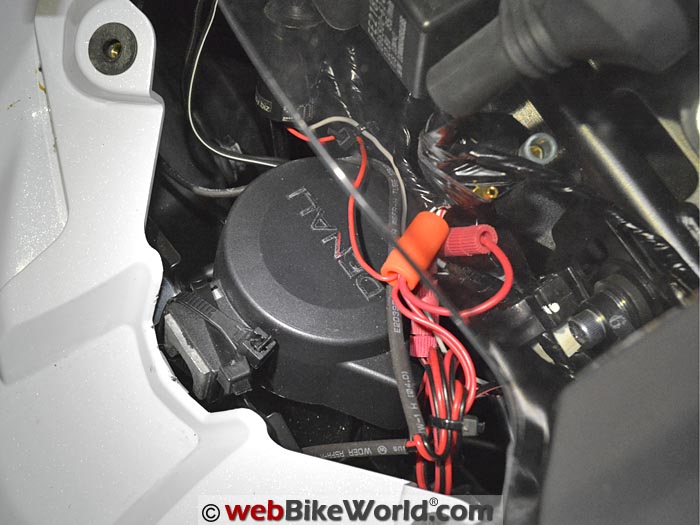
Looking down into the recess, there’s a flat metal bar that runs horizontally side-to-side in the fairing, just behind the front opening when the black panel is removed. And as it happens, there’s just enough space just behind that metal bar to fit the compressor of the Soundbomb split horn.
All you have to do is use a Dremel with cut-off wheel to carve a slot in the compressor mounting boss (see photos), hang it over the flat bar and secure it with a couple of cable ties (aka “zip ties”). Don’t worry — it’s not going anywhere, so it doesn’t have to be bolted down.
Once we figured that out, the rest was easy.
Mounting the Horn Trumpets
We then used a small piece of an old inner tube cut into a small rectangle to cushion the top of the plastic horn trumpet section and used two cable ties to secure the trumpets to the round metal bar that also runs horizontally under the Versys’ fairing.
It can be accessed from underneath the fairing, as you can see from the photos.
Be sure to first cut and locate the plastic tube from the compressor to the horn trumpets; cut the tube as short as possible but be sure to give it an easy radius so it doesn’t crimp. Again, measure about four times before you cut!
The hose slides over a nipple on the compressor and likewise on the trumpet. Also, be sure to connect the power and ground leads to the terminals on the bottom of the compressor before you secure it with the zip ties.
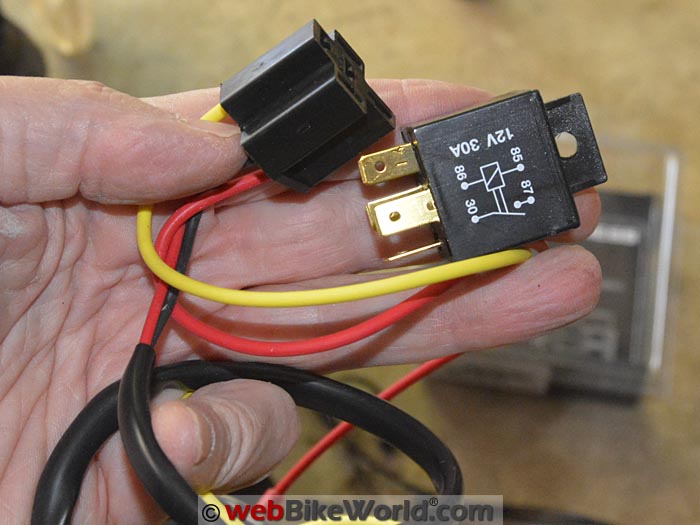
For some reason, the Denali horn wiring harness does not come with a relay. The relay is included with the horn though.Horn Wiring Harness
For this installation, we used the Twisted Throttle horn wiring harness kit, which has a lengthy name of the “Denali Plug-N-Play Wiring Kit For Denali SoundBomb Compact & Split Dual-Tone Air Horns & Stebel Air Horn”
It may seem a little expensive at $26.99, but it’s only by about $5.00 or so over the equivalent quality horn wiring kits you’ll find elsewhere, like the horn wiring kits for sale on the webBikeWorld Amazon.com Store. Note that the Denali harness kit does not come with a relay; the relay is included with the horn.
Again, the hard part is mounting the horn, although as always, we did all the hard work figuring this out so you can benefit!
Installing and attaching the horn wiring harness is straightforward and we’ve covered that several times in various webBikeWorld motorcycle horn reviews and motorcycle light reviews (check those pages for links to the various articles and reviews).
You probably will have to cut and splice the harness wires though, as they’re usually too long for most bikes.
We chose to locate the horn relay back under the fuel tank on the left-hand side. It hasn’t rained since, so I’m hoping it won’t be affected but it seems well-hidden once the side fairing pieces are reinstalled.
 The separate horn trumpet has two molded holes on top for attaching with zip ties. Here’s a view of the connected horn wiring harness and the location of the horn relay. Note the trumpets are pointing forward and aren’t blocked by any fairing pieces.
Sound Output
The Soundbomb horn is claimed to have a 120 dB output, measured at three feet away. As we have detailed in several horn reviews, however, accurately measuring the volume is highly variable.
It’s interesting to note that using the Extech dB meter, we measured the split Soundbomb horn at exactly the same 118 dBA as the single unit Soundbomb horn, measured 1 meter away.
The tone of the split Soundbomb horn is slightly deeper than the single horn, which may just be a manufacturing tolerance or it may have something to do with the slight amount of travel of the air through the tube for the split horn.
And in case you’re wondering, there is no delay when pressing the horn button until the sound is heard from the split version. We were wondering about that as you may have been, but there’s no difference that we can tell.
The split horn has the same sort of higher pitched “European sports car” sound and since the trumpets on our Versys mounting arrangement point directly forward and are not blocked by any fairing pieces, it’s pretty loud.
Denali Soundbomb Split Horn .mp3
Here’s a quick Denali Split Soundbomb .mp3 file (opens in new window) with the sound of the original 2015 Kawasaki Versys 650 LT horn compared to the sound of the Soundbomb split horn.
You may have to file these to plastic supports on the underside of the black fairing cover to fit over the horn compressor.Conclusion
The Denali Soundbomb split horn isn’t necessarily easier to install than the single horn. Both take up a large portion of precious real estate on any motorcycle.
Your best bet is probably to buy one of the Twisted Throttle horn mounting brackets if it is available for your bike.
If not, you’ll probably find that figuring out a suitable location for this or any horn and then fabricating a bracket or figuring out a mounting solution is the most difficult part of adding an accessory horn.
Always use a horn wiring harness kit with relay to power a horn and the good kits are pretty much plug-and-play for your power and ground wires on the stock horn.
Which means you don’t have to try and find the wire that leads from the horn button to trigger your new horn (those can be difficult to find and access in the wiring harness).
Like the single Denali horn, the split horn is very loud, with a piercing tone that should get all the attention you need.
And don’t forget, a horn is a last resort tool. You should always ride a motorcycle defensively — as if you were invisible. Don’t count on using a horn to get vehicles to move out of your way.
Owner Comments and Feedback
See details on submitting comments